Azure Blueprints level parameters and why you should use them

Azure Blueprints have been out in preview for a about half a year now and for those who haven't used them yet: they're pretty powerful! Fair enough, it's still in preview and there are still some features that need to be added but there is no reason not to start using them right now.
So what are they exactly and why do you need to use them?
To quote Microsoft:
"Just as a blueprint allows an engineer or an architect to sketch a project's design parameters, Azure Blueprints enables cloud architects and central information technology groups to define a repeatable set of Azure resources that implements and adheres to an organization's standards, patterns, and requirements. Azure Blueprints makes it possible for development teams to rapidly build and stand up new environments with trust they're building within organizational compliance with a set of built-in components -- such as networking -- to speed up development and delivery." (source: https://docs.microsoft.com/en-us/azure/governance/blueprints/overview).
By just using the Azure Portal you can quite easily whip together a Blueprint, add your artifacts and deploy them altogether (basic Blueprint quick starts can be found here: https://docs.microsoft.com/en-us/azure/governance/blueprints/). But if you truly want to deploy new environments quickly without having to spend time customizing each deployment then there are some features that are not yet available through the portal. One of those features is Blueprint level parameters. A really powerful feature that will help you achieve those rapid deployments over multiple environments. And as an added bonus: it will take little to no changes to your existing ARM Templates.
Blueprint level parameters
Blueprint level parameters are pretty well documented (https://docs.microsoft.com/en-us/azure/governance/blueprints/concepts/parameters), but for the people just starting out it can be quite overwhelming. Especially as they can only be configured through the REST APIs.
But.. it is worth it as this is exactly the feature you need when you want to truly benefit from Azure Blueprints.
Blueprint level parameters are parameters that are available to the artifacts in your Blueprints. But by defining them at the highest level you will add consistency (naming conventions, prefixes) and you have the ability to reuse your template (say for a different customer) without going through the artifacts and changing the names.
For example: let's say you are deploying a new customer and for each customer you deploy a Web App with a self-service portal. Configuring your artifacts to use Blueprint level parameters will let you personalize each deployment without having to go through the artifacts and change the settings of that Web App. When deploying at scale this is something you definitely want have in place.
As mentioned before, Blueprint level parameters can currently only be configured through the REST API. Let's do just that. In this example we will keep it small and focus on the name of the Web App and see how parameters are parsed from a Blueprint level to an artifact. In addition I have added a policy that will check if the App is configured to only allows HTTPS traffic (we want our customer portal to be secure right?) :)
If all goes well we will end up with the following configuration:
- Assigned Blueprint with Blueprint level parameters
- Resource Group
- App Service Plan
- App Service
- Policy auditing if HTTPS Only is configured
For the policy I have created a custom policy. If you want to use the same policy, you can create one using the following definition:
{
  "if": {
    "allOf": [
      {
        "field": "type",
        "equals": "Microsoft.Web/sites"
      },
      {
        "not": {
          "field": "Microsoft.Web/sites/httpsOnly",
          "equals": "true"
        }
      }
    ]
  },
  "then": {
    "effect": "audit"
  }
}
(check https://docs.microsoft.com/en-us/azure/governance/policy/tutorials/create-and-manage on how to create a custom policy)
I am aware that there is a similar preview policy built-in that should do the same but let's just say it's definitely still in preview :) please also note that this policy will not make a distinction between Apps (Web Apps, Logic Apps, Function Apps, etc.).
Connecting to the API
First let's create the necessary tokens to connect to our Azure Environment. I like to use Management Groups as it prevents me from having to deal with Subscription IDs. When managing multiple subscriptions you might want to look into use Management Groups anyway as they are great for organizing your subscriptions, teams and resources (https://docs.microsoft.com/en-us/azure/governance/management-groups/).
The example below can be executed through PowerShell using the Azure PowerShell Az Module and will provide you with the tokens to make calls to the REST API(more detailed information at https://docs.microsoft.com/en-us/powershell/azure/new-azureps-module-az?view=azps-1.4.0).
$azContext = Get-AzContext
$subscriptionID = 'xxxxxxxx-xxxx-xxxx-xxxx-xxxxxxxxxxxx'
$azProfile = [Microsoft.Azure.Commands.Common.Authentication.Abstractions.AzureRmProfileProvider]::Instance.Profile
$profileClient = New-Object -TypeName Microsoft.Azure.Commands.ResourceManager.Common.RMProfileClient -ArgumentList ($azProfile)
$token = $profileClient.AcquireAccessToken($azContext.Subscription.TenantId)
$authHeader = @{
    'Content-Type'='application/json'
    'Authorization'='Bearer ' + $token.AccessToken
}


$restUri = "https://management.azure.com/subscriptions/"+$subscriptionID+"?api-version=2016-06-01"
$response = Invoke-RestMethod -Uri $restUri -Method Get -Headers $authHeader
Make sure you are connected to Azure (Connect-AzAccount) before executing.
Requesting $response should now indicate that you posses the necessary information to invoke REST requests and communicate with the API's.
Blueprint Definition
The Blueprint level parameters are defined in the Blueprint definition. This is important to keep in mind as this will impact the artifacts you will later be creating.
Let keep it small and start by implementing parameters for the App service names. These parameters will later be available within our artifacts (AppName and AspName).
blueprintDefinition.json
{
    "properties": {
        "description": "Blueprint with Blueprint level parameters",
        "targetScope": "subscription",
        "parameters": {
            "AppName": {
                "type": "string",
                "metadata": {
                    "description": "Name of the WebApp"
                }
            },
            "AspName": {
                "type": "string",
                "metadata": {
                    "description": "Name of the App Service Plan"
                }
            }
        },
        "resourceGroups": {
            "rg-general": {
                "description": "Resource Group for general resources"
            }
        }
    }
}
Because we are going to use the "PUT" method to send our Blueprint to the API we need to parse a JSON formatted variable (templates) to the API using the "body" parameter. To prevent from having to copy and paste templates into the PowerShell script whenever I want to create a new Blueprint draft, I slightly changed the code used to initiate the connection to take parameters. I know it's quick and dirty... but it works :)
For now, we need a parameter to define our JSON content which is saved into a file, the name of Blueprint we want to create and the Management Group we are going to deploy to. To achieve this, I used the following code:
put_blueprint.ps1
param([string]$file,
[string]$name,
[string]$managementGroup
)

$azContext = Get-AzContext
$azProfile = [Microsoft.Azure.Commands.Common.Authentication.Abstractions.AzureRmProfileProvider]::Instance.Profile
$profileClient = New-Object -TypeName Microsoft.Azure.Commands.ResourceManager.Common.RMProfileClient -ArgumentList ($azProfile)
$token = $profileClient.AcquireAccessToken($azContext.Subscription.TenantId)
$authHeader = @{
    'Content-Type'='application/json'
    'Authorization'='Bearer ' + $token.AccessToken
}

$body = Get-Content $file
$restUri = "https://management.azure.com/providers/Microsoft.Management/managementGroups/$managementGroup/providers/Microsoft.Blueprint/blueprints/"+$name+"?api-version=2018-11-01-preview"
$response = Invoke-RestMethod -Uri $restUri -Method Put -Headers $authHeader -Body $body
We can now create a new Blueprint draft by running ".\put_blueprint.ps1 -file .\blueprintDefintion.json -name "General_Blueprint" -managementGroup "CustomerSubscriptions01".
Checking the Azure Portal we confirm that our Blueprint definition has been created.

Now that we have our Blueprint definition configured with parameters we can start deploying the artifacts and make use of those parameters.
Policy Assignment
Because I want to audit whether my Web Apps are configured with the "httpsOnly" property I need an artifact that holds the Policy Assignment.
policyAssignment.json
{
    "properties": {
        "displayName": "Audit HTTPS only access for a Web Application",
        "policyDefinitionId": "/subscriptions/xxxxxxxx-xxxx-xxxx-xxxx-xxxxxxxxxxxx/providers/Microsoft.Authorization/policyDefinitions/6156644c-12af-4e28-ae6f-b85a454eb931",
        "parameters": {}
    },
    "kind": "policyAssignment"
}
Note that you can find the policyDefinitionId by going to the Policy definitions using the Azure Portal.
Deploying the policy artifact through the REST API is similar to deploying the Blueprint definition, with the only difference that we now have to configure what Blueprint we want to deploy to and what the name of our artifact is.
To apply the policyAssignment either do it manually or use aforementioned script to invoke the rest method. In the end you're request should look similar to the code below. Personally, I prefer to create a copy of the initial script and change whatever needs changing as this makes it easier for debugging (small steps).
put_artifacts.ps1
param([string]$file,
[string]$blueprint,
[string]$artifactName,
[string]$managementGroup
)

// Redacted - Connection to API

}
$body = Get-Content $file
$restUri = "https://management.azure.com/providers/Microsoft.Management/managementGroups/$managementGroup/providers/Microsoft.Blueprint/blueprints/$blueprint/artifacts/"+$artifactName+"?api-version=2018-11-01-preview"
$response = Invoke-RestMethod -Uri $restUri -Method PUT -Headers $authHeader -Body $body
Web App Artifact
This is where things get magical. Blueprint artifacts for resources are not much different from ARM Templates. You can grab the same template and put it into an artifact. To make it a little bit easier let's first take look at the artifact itself (without the ARM template contents).
Empty artifact
{
    "kind": "template",
    "properties": {
        "template": {

            **ARM Template goes here**

        },
        "resourceGroup": "rg-general",
        "parameters": {
            "webAppName": {
                "value": "[parameters('AppName')]"
            },
            "appServicePlanName": {
                "value": "[parameters('AspName')]"
            }
        }
    }
}
Looking the the above code you can see that we have an artifact of kind "Template" and that it takes an ARM template for a property. Additionally you can see that it also takes a property called "parameters" outside of the ARM template. This is what we will be using. If you followed closely you can see that those parameters correspond with the parameters from the Blueprint definition (AppName and AspName). We're actually parsing those parameters to the template. The parameters within our artifact will look as such:
{
    "kind": "template",
    "properties": {
        "template": {
            "$schema": "https://schema.management.azure.com/schemas/2015-01-01/deploymentTemplate.json#",
            "contentVersion": "1.0.0.0",
            "parameters": {
                "webAppName": {
                    "type": "string",
                    "metadata": {
                      "description": "Web App name"
                    },
                    "minLength": 2
                  },
                  "appServicePlanName": {
                    "type": "string",
                    "metadata": {
                      "description": "App service plan name"
                    },
                    "minLength": 2
                  },
                  "sku":{
                    "type": "string",
                    "defaultValue" : "S1",
                    "metadata": {
                      "description": "The SKU of App Service Plan, by defaut is standard S1"
                    }
                  }
                },
            "resources": [ Redacted ]
        },
        "resourceGroup": "rg-general",
        "parameters": {
            "webAppName": {
                "value": "[parameters('AppName')]"
            },
            "appServicePlanName": {
                "value": "[parameters('AspName')]"
            }
        }
}
}
You can see we have two sets of parameters a set within the ARM template and a set as a property of the artifact. So what is actually happening? Let's visualize:
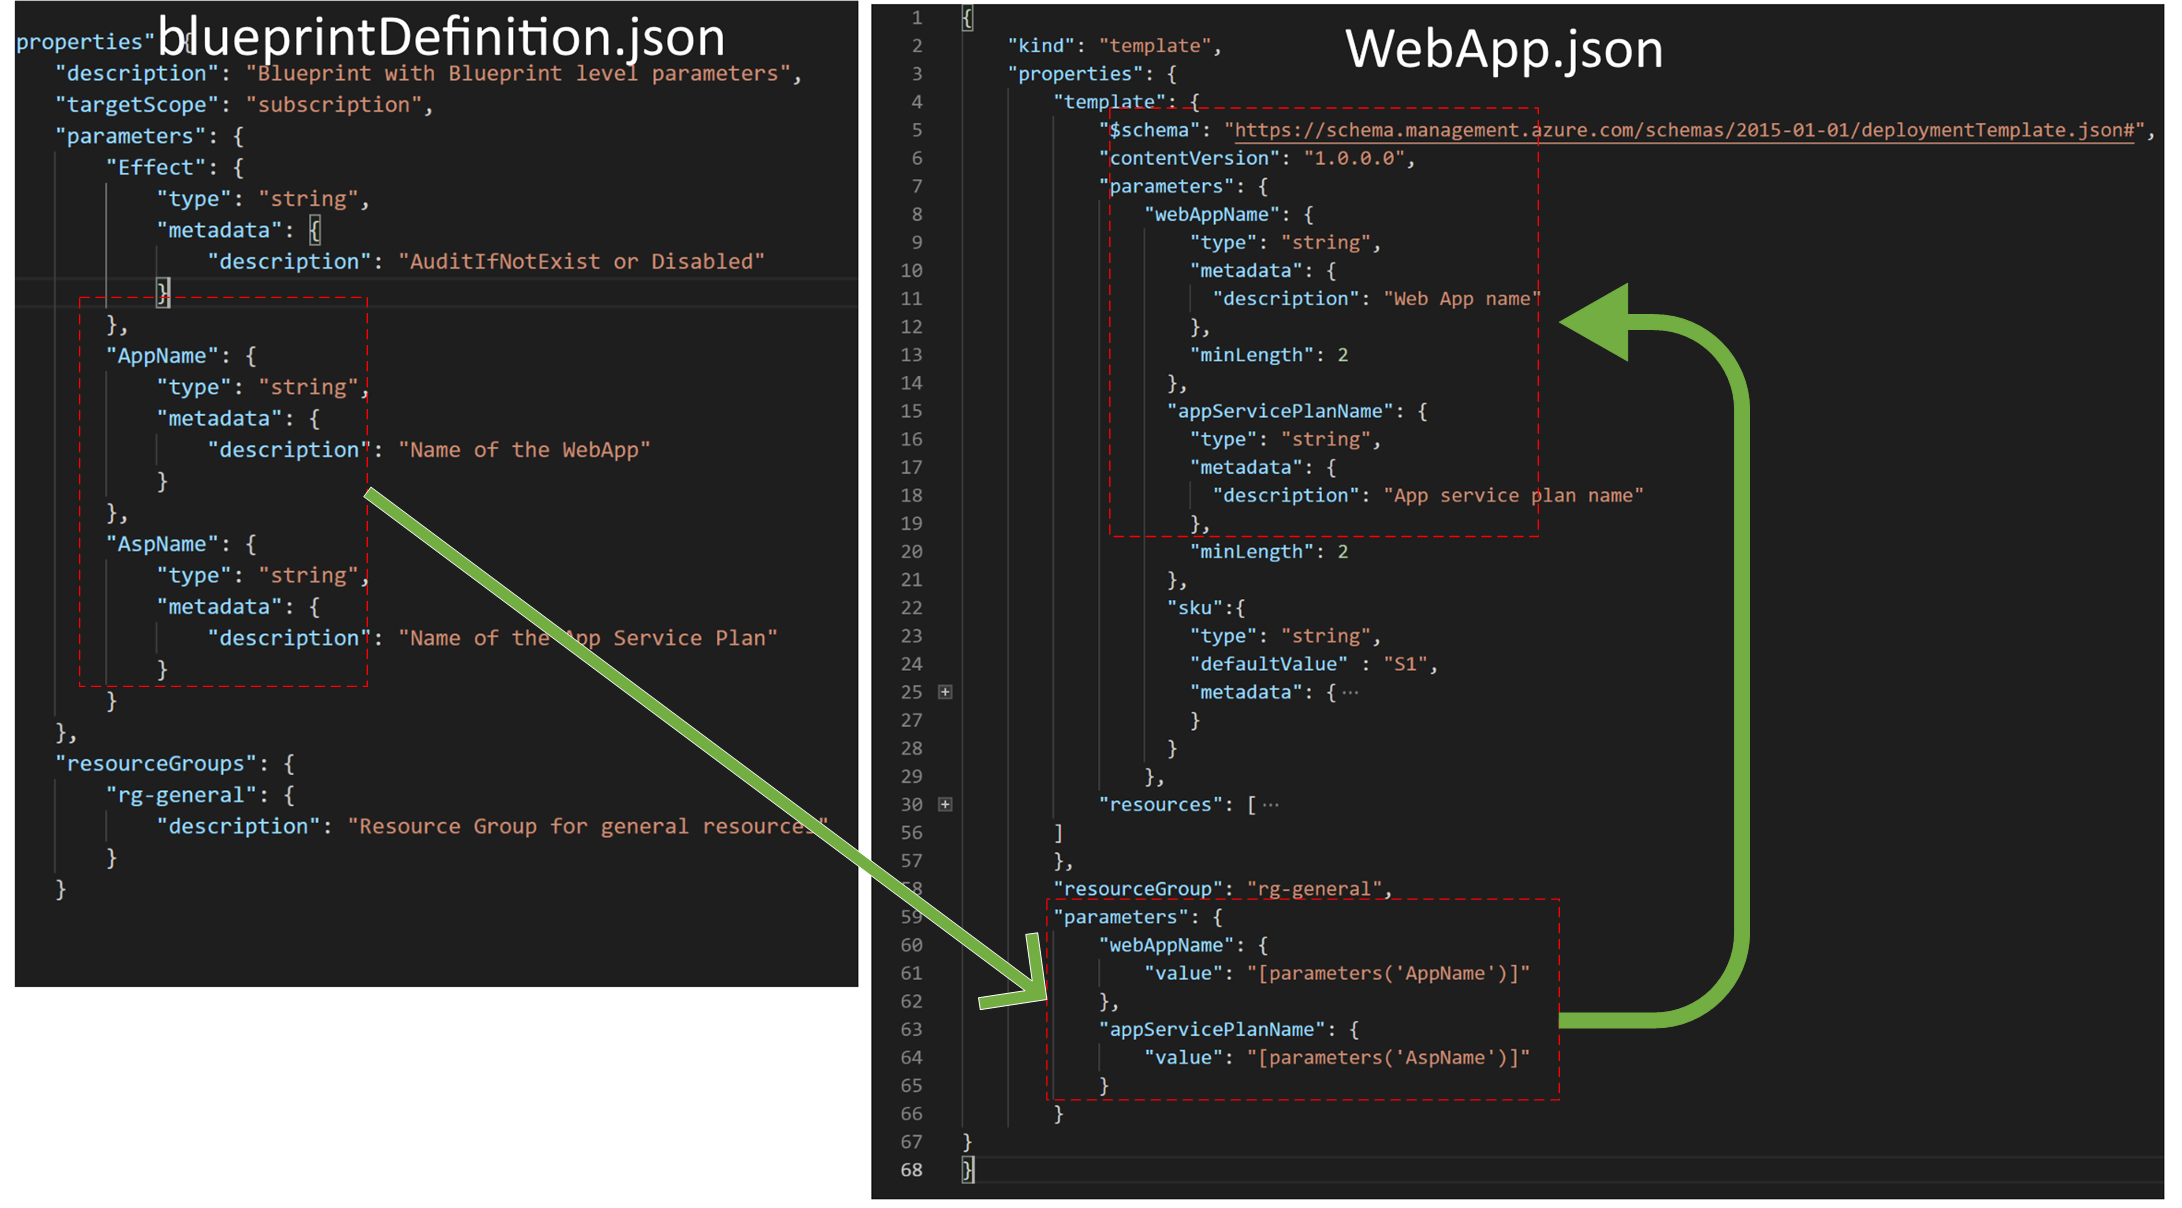
The bluePrintDefition.json is essentially your Blueprint and holds the parameters. During the assignment of the Blueprint the parameters are declared during the deployment of an artifact and the parameters will be parsed into the ARM template.
In the WebApp.json we have two sets of parameters, one set within he ARM Template and one separate set as a part of the artifact. The parameters from the artifact (bottom right) take data from the blueprintDefinition and will parse it into the ARM template.
Publishing the Blueprint
Now that the parameters are "linked" together we can publish the Blueprint. Publishing a Blueprint through the REST API is done by invoking the request with the following URI:
$restUri= "https://management.azure.com/providers/Microsoft.Management/managementGroups/$managementGroup/providers/Microsoft.Blueprint/blueprints/$blueprint/versions/"+$version+"?api-version=2018-11-01-preview"
The last step in the process is assigning the Blueprint to a scope. In this case we will assign the Blueprint to a Subscription within the Management Group. This is when we will populate the parameters as defined in the blueprintDefinition.json. And this is exactly the place where you want to manage your parameters.
If you use the Blueprint level parameters you can limit your changes to just this single call instead of going through the artifacts.
{
    "properties": {
        "blueprintId": "/providers/Microsoft.Management/managementGroups/CustomerSubscriptions01/providers/Microsoft.Blueprint/blueprints/General_Blueprint",
        "resourceGroups": {
            "rg-general": {
                "name": "rg-general",
                "location": "westeurope"
            }
        },
        "parameters": {
            "AppName":
            {
                "value": "app-PortalCustomerX"
            },
            "AspName":
            {
                "value": "asp-PortalCustomerX"
            }
        }
    },
    "identity": {
        "type": "systemAssigned"
    },
    "location": "westeurope"
}
The request to assign a Blueprint is similar to adding the artifacts. However, because we're assigning to a subscription we need to reference the subscription in our call:
$restUri = "https://management.azure.com/subscriptions/$subscriptionID/providers/Microsoft.Blueprint/blueprintAssignments/"+$assignmentName+"?api-version=2018-11-01-preview"
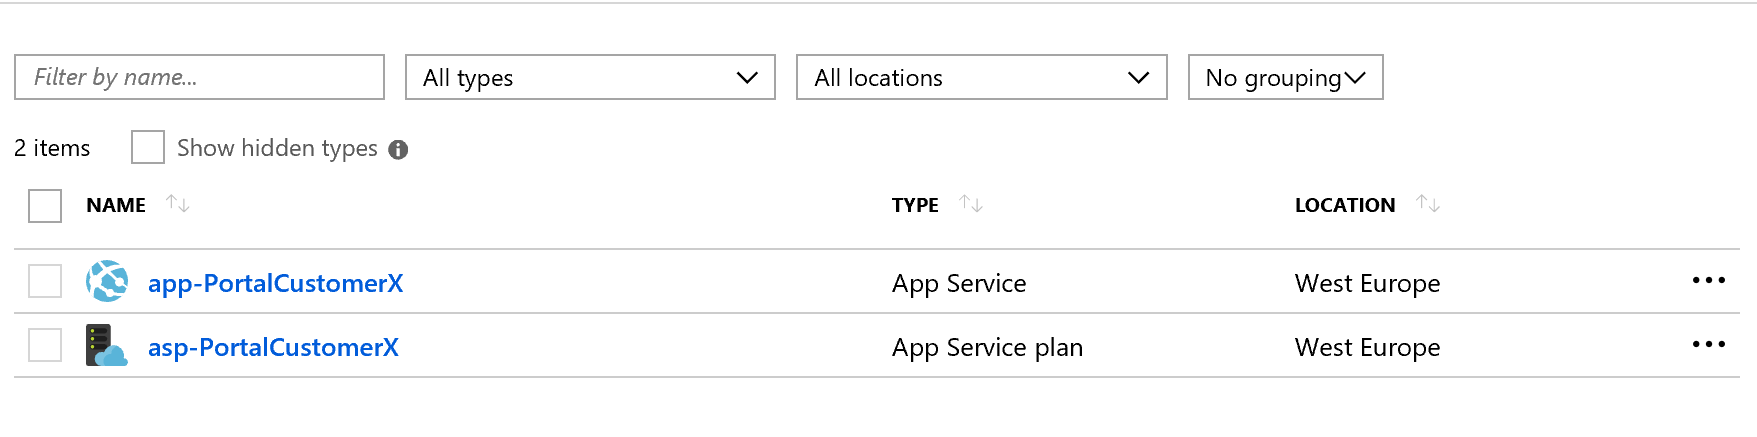
When browsing to the Azure Portal and navigating to "Blueprints" you will now see that the Blueprint is successfully assigned to the subscription and that the resources as defined in the artifacts have been deployed.
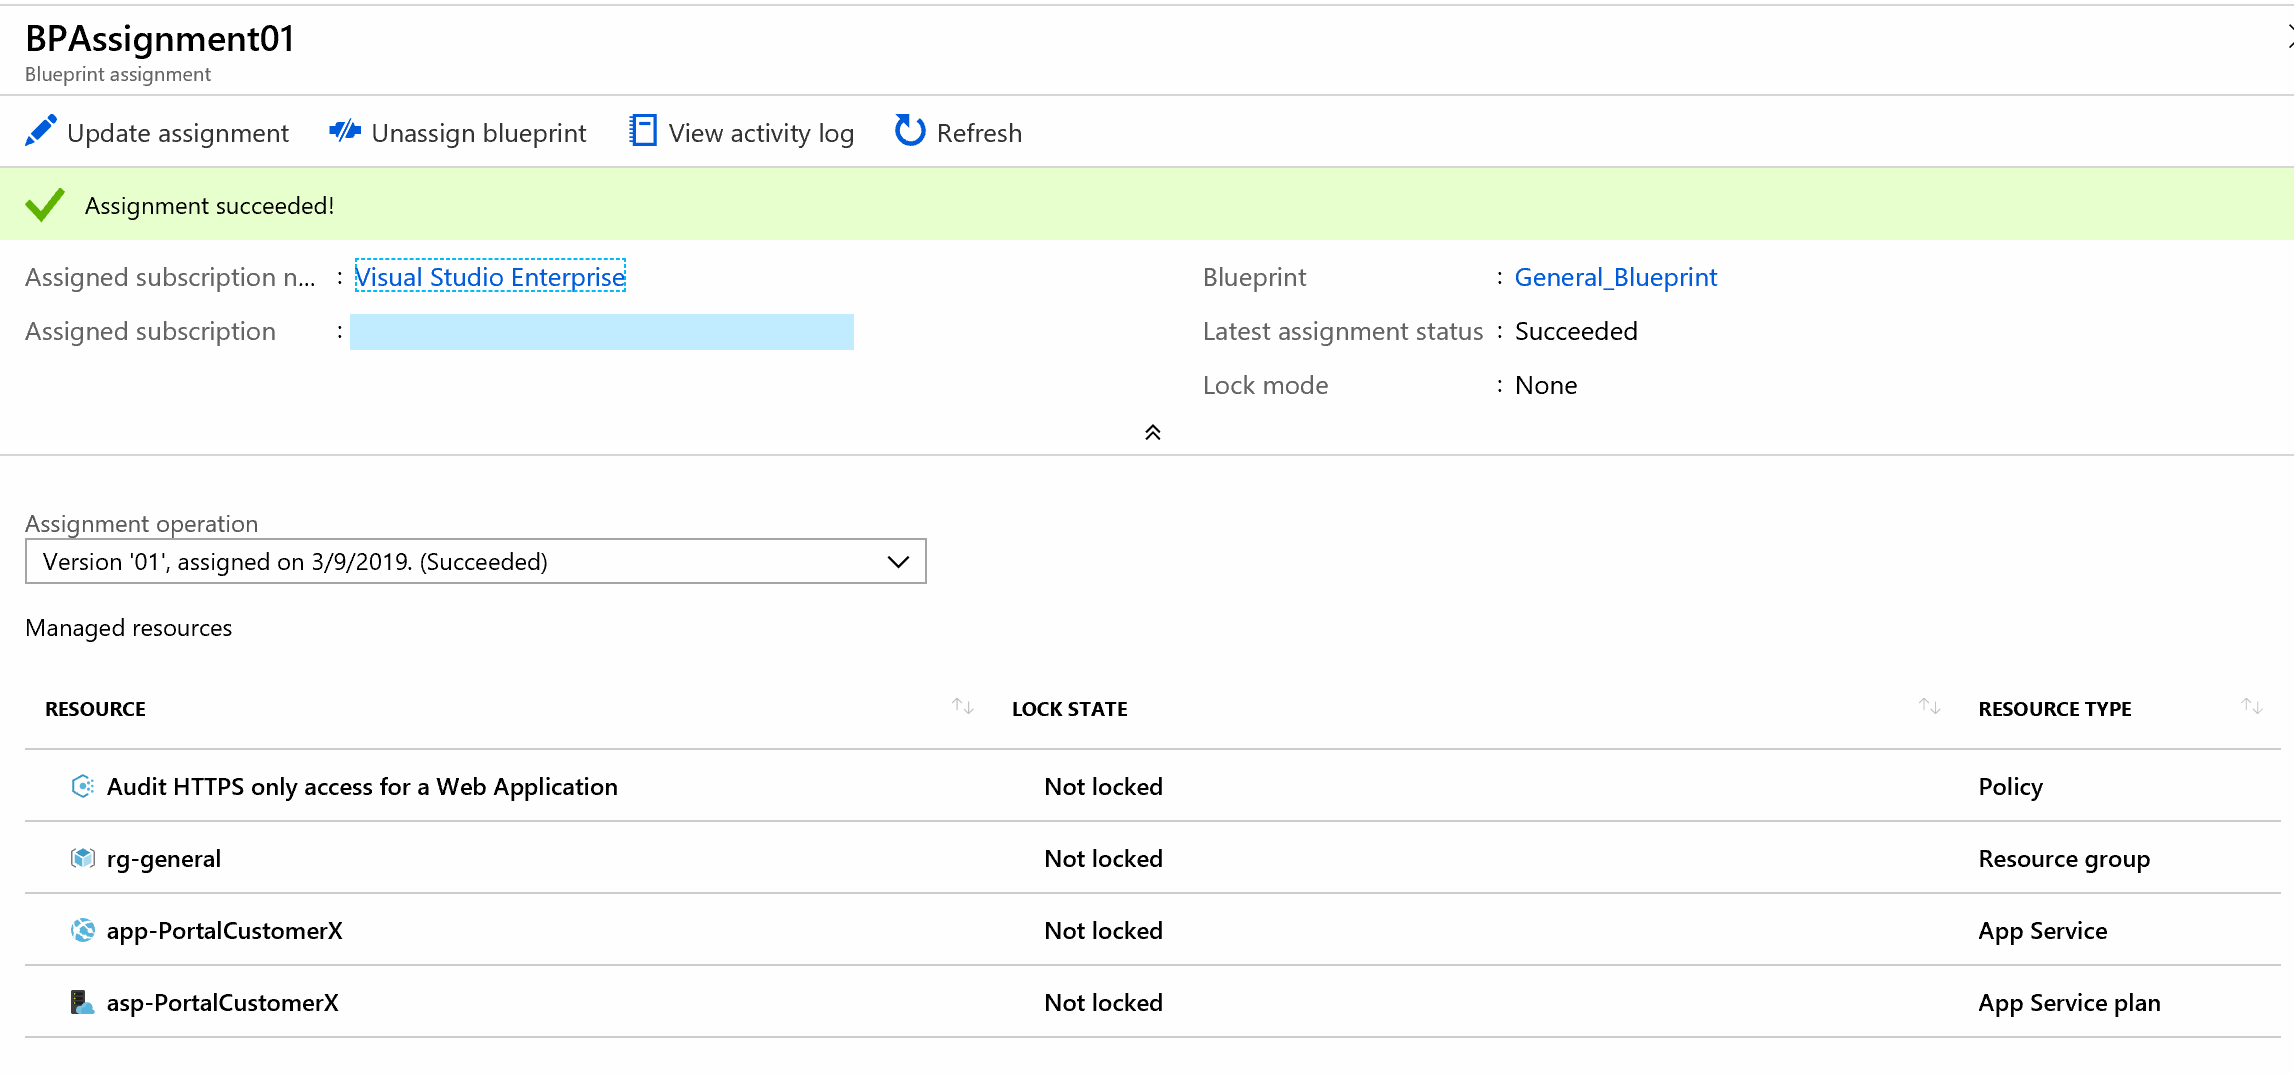
And finally, the Policy we configured that has kicked in and performed an audit:
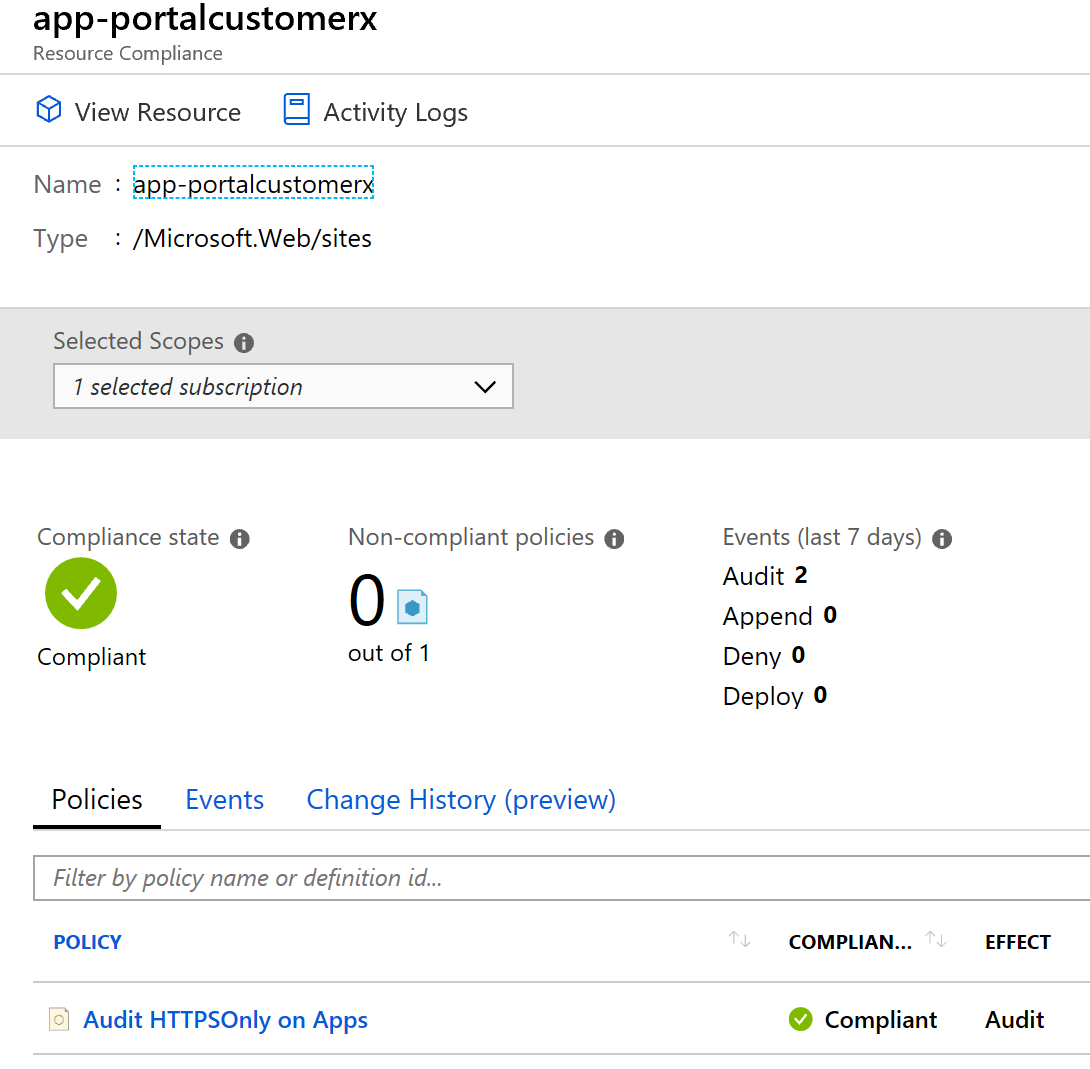
And there you go. Blueprint level parameters in action. We can now easily deploy a new Blueprint to a different customer with different naming configuration just be editing the parameters in our assignment. No need to change the artifacts.