Azure Functions as an endpoint for your Automation Runbooks
I've always been intrigued by Azure Functions and Microsoft's Azure serverless proposition. But... I'm not a developer, so how useful are they to me? Well it turns out they can be pretty useful! But how much development skills do you actually need? To be fair I've been getting into development more and more recently. One of the reasons being that I want to understand what is truly happening in the world of serverless instead of limiting myself to design concepts.
As non-developers how can Azure functions benefit us then? Well one things I always worry about when I see people automating stuff in Azure is the use of Webhooks and the lack of authentication. The use of Webhooks is usually something you "grow in to". If we knew the end goal from the beginning we would've probably built it different, right? :)
In some cases you probably started with a Runbook, scheduled it and at some point a different team doesn't want to wait for the schedule and want's to run it on demand. Your quick fix: usually a Webhook. As time goes by you might end up with a batch of Runbooks and Webhooks.
What you essentially end up with is multiple endpoints with no authentication and through your Runbooks they all have access to your Azure environment (usually). As long as you don't share the token you don't have to worry too much but, what if you have multiple customers that want to be able to deploy stuff on their own? The more you share the Webhook tokens, the higher the chances are it will end up in the wrong place. And fair enough, you can build some logic into your Runbook to only continue when the correct body is presented, but isn't this the same level of security you get with the static token? And... You are already executing stuff within the Runbook. In fact, you either want to use one-time webhooks or only share the information with a single entity (an Azure Function perhaps?)
Use case
Let's take a simple use case to illustrate the possibilities when using an Azure Function in combination with Azure Automation. What I want to achieve is the following:
- Authentication using Azure AD;
- Provide a single dependable endpoint that I can share with other teams, customers or applications;
- Have multiple Runbooks;
- Deploy a Web App to either my Standard or Performance App service plan.
And to further illustrate the use case let's just say my Standard App Service Plan is has a size of "S1" with no fancy features enabled and my Performance App Service Plan is meant for Web Apps that need a lot of resources and can deal with the auto scaling features enabled.
Design
I've come up with a quick design of what I want to achieve. I want to access my Azure Function, authenticate through Azure AD and then give it the information it needs to deploy my Web Apps to the right App Service Plan.
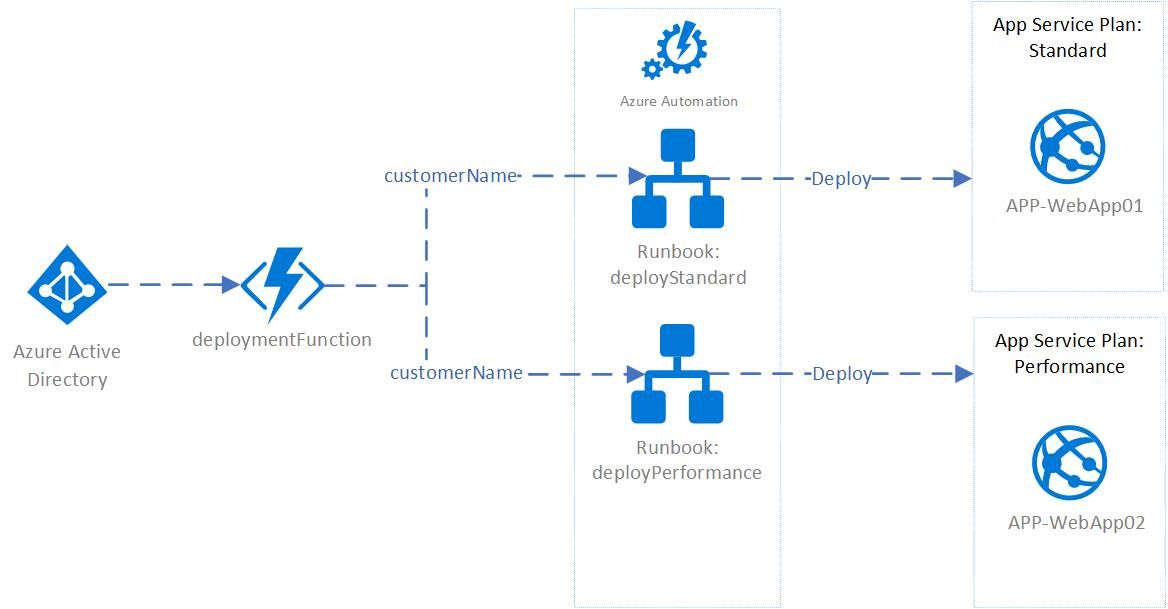
The next question is where to configure the logic. And to be fair, there are a million possibilities as to where you want to configure which logic. You can build all the logic into the Function and don't use any Runbooks at all or you could build the logic into the Runbooks and just use the Azure Function as a gate to pass through.
To illustrate this I've spread the logic. The Azure Function will take two parameters:
- customername
- customertype
"customername" is the name of the customer and also the name that will be appended to the "APP-" prefix when deploying the Web App.
"customertype" determines the performance level, a value of "standard" will deploy the Web App to App Service Plan "ASP-Standard" whereas "performance" will deploy the Web App to "ASP-Performance".
The Azure Function will forward the request to the corresponding Runbook.
The Runbooks itself barely have any logic configured, they both use the same Resource Manager template and they only take one parameter "customerName" The only difference is the configured parameter for the existing App Service Plan.
Requirements:
To deploy the sample below you need:
- An Azure Function;
- Visual Studio;
- Azure Function tools for Visual Studio (https://docs.microsoft.com/en-us/azure/azure-functions/functions-develop-vs)
- Automation Account;
- Administrative Access to Azure AD;
- Two App Service plans.
- Optional: Azure Function Core tools for local debugging (https://docs.microsoft.com/en-us/azure/azure-functions/functions-run-local)
Azure Function Configuration
This is where the development starts. So how much development do you actually need to do and what do you need to know? Well basic C# knowledge will help and with a little help from https://docs.microsoft.com and https://stackoverflow.com I have managed just fine (I'm still struggling with abstract classes and interfaces if that will tell you anything about my level of programming). The code isn't perfect and there is probably a lot that can be refactored, but from a DevOps perspective, it'll do.
First we need an Azure Function. I've gone with the consumption plan. Choose ".NET" as the runtime stack and Windows for the OS.

I build the function based on the default HTTP Trigger template. Once you have the Azure Function tools for Visual Studio installed you can create one by initializing a new project and use the HTTPTrigger sample (https://docs.microsoft.com/en-us/azure/azure-functions/functions-create-your-first-function-visual-studio)
What you end up with is some basic code that once published, will provide you with the possibility to send a request and it will return data. Basically the Azure Function version of "Hello World".
Default HTTPTrigger
 public static class Function1
    {
        [FunctionName("Function1")]
        public static async Task Run(
            [HttpTrigger(AuthorizationLevel.Function, "get", "post", Route = null)] HttpRequest req,
            ILogger log)
        {
            log.LogInformation("C# HTTP trigger function processed a request.");

            string name = req.Query["name"];

            string requestBody = await new StreamReader(req.Body).ReadToEndAsync();
            dynamic data = JsonConvert.DeserializeObject(requestBody);
            name = name ?? data?.name;

            return name != null
                ? (ActionResult)new OkObjectResult($"Hello, {name}")
                : new BadRequestObjectResult("Please pass a name on the query string or in the request body");
        }
    }
I've build on top of the HTTPTrigger sample and started adding functionality. First we need to change the authorization level to anonymous as we will be using Azure AD. You can change the authorization level on the Azure Function portal itself if you decide to go with C# scripting, however when you publish a build solution, you need to do this in the code itself.
Additionally I have added the "Extension" class that will provide a function that parses values "AsJson" when requested.
Up until now the code will look similar to the following:
public static class Extensions

    {
        public static StringContent AsJson(this object o)
         => new StringContent(JsonConvert.SerializeObject(o), Encoding.UTF8, "application/json");
    }

    public static class DeploymentFunction
    {
        private static HttpClient httpClient = new HttpClient();

        [FunctionName("deploymentFunction")]

        //Set AuthorizationLevel to Anonymous for Azure AD Authentication
        public static async Task Run(
            [HttpTrigger(AuthorizationLevel.Anonymous, "get", "post", Route = null)] HttpRequest req,
            ILogger log, ExecutionContext context)
        {
            log.LogInformation("Trigger Processed a request");
We will store our Automation Webhook URI's in the Application Settings of the Azure Function, so we need to access those from our Azure Function. We can do this by using "ConfigurationBuilder" (https://docs.microsoft.com/en-us/dotnet/api/microsoft.extensions.configuration.configurationbuilder?view=aspnetcore-2.2).
// Access to App Settings
var config = new ConfigurationBuilder()
            .SetBasePath(context.FunctionAppDirectory)
            .AddJsonFile("local.settings.json", optional: true, reloadOnChange: true)
            .AddEnvironmentVariables()
            .Build();
The above code snippets is actually what took most of the time research-wise. The following code snippets, that actually contain the logic for what we are trying to achieve are much more straight forward but get the job done.
First we want to modify the existing "name" query and build the logic we need to accept our "customername" and "customertype" parameters.
string customername = req.Query["customername"];
string customertype = req.Query["customertype"];

string requestBody = await new StreamReader(req.Body).ReadToEndAsync();
dynamic data = JsonConvert.DeserializeObject(requestBody);

customername = customername ?? data?.customername;
customertype = customertype ?? data?.customertype;
Next we need some logic that will check the input and control the flow (configure the URI for the Webhook we need). This can be done by using "if" and "else" conditions but I find "switch" to be a much better and more readable option here.
// Check if customername is empty
            if (customername == null)
            {
               return new BadRequestObjectResult("Please pass the customer name");
            }

            string performancetype = customertype;

            // If no customertype is parsed, use standard performance tier as default
            string BaseUri = config["automationURIStandard"];

            switch (performancetype)
            {
                case "standard":
                    BaseUri = config["automationURIStandard"];
                    break;
                case "performance":
                    BaseUri = config["automationURIPerformance"];
                    break;
            }
We now have the logic that will logic that will set "BaseUri" to right address. As we have implemented ConfigurationBuilder earlier we can now request these URI's from our App Settings by requesting config["AppSettingName"].
Last but not least we need to configure the contents of the webhook body and initiate the request using "httpClient.PostAsync".
Note that in the request we are posting "automationContent" with the ".AsJson" function we created in the first code snippet using the class "Extension".
// Content webhook body
            var automationContent = new
            {
                customerName = customername
            };

            //Post to webhook
            var response = await httpClient.PostAsync(BaseUri, automationContent.AsJson());
            var contents = await response.Content.ReadAsStringAsync();

            return (ActionResult)new OkObjectResult(contents);
        }
    }
}
That completes the function and we can publish it to our Azure Function.
The completed code can be found at https://github.com/whaakman/DeploymentAutomation/tree/master/deploymentFunction
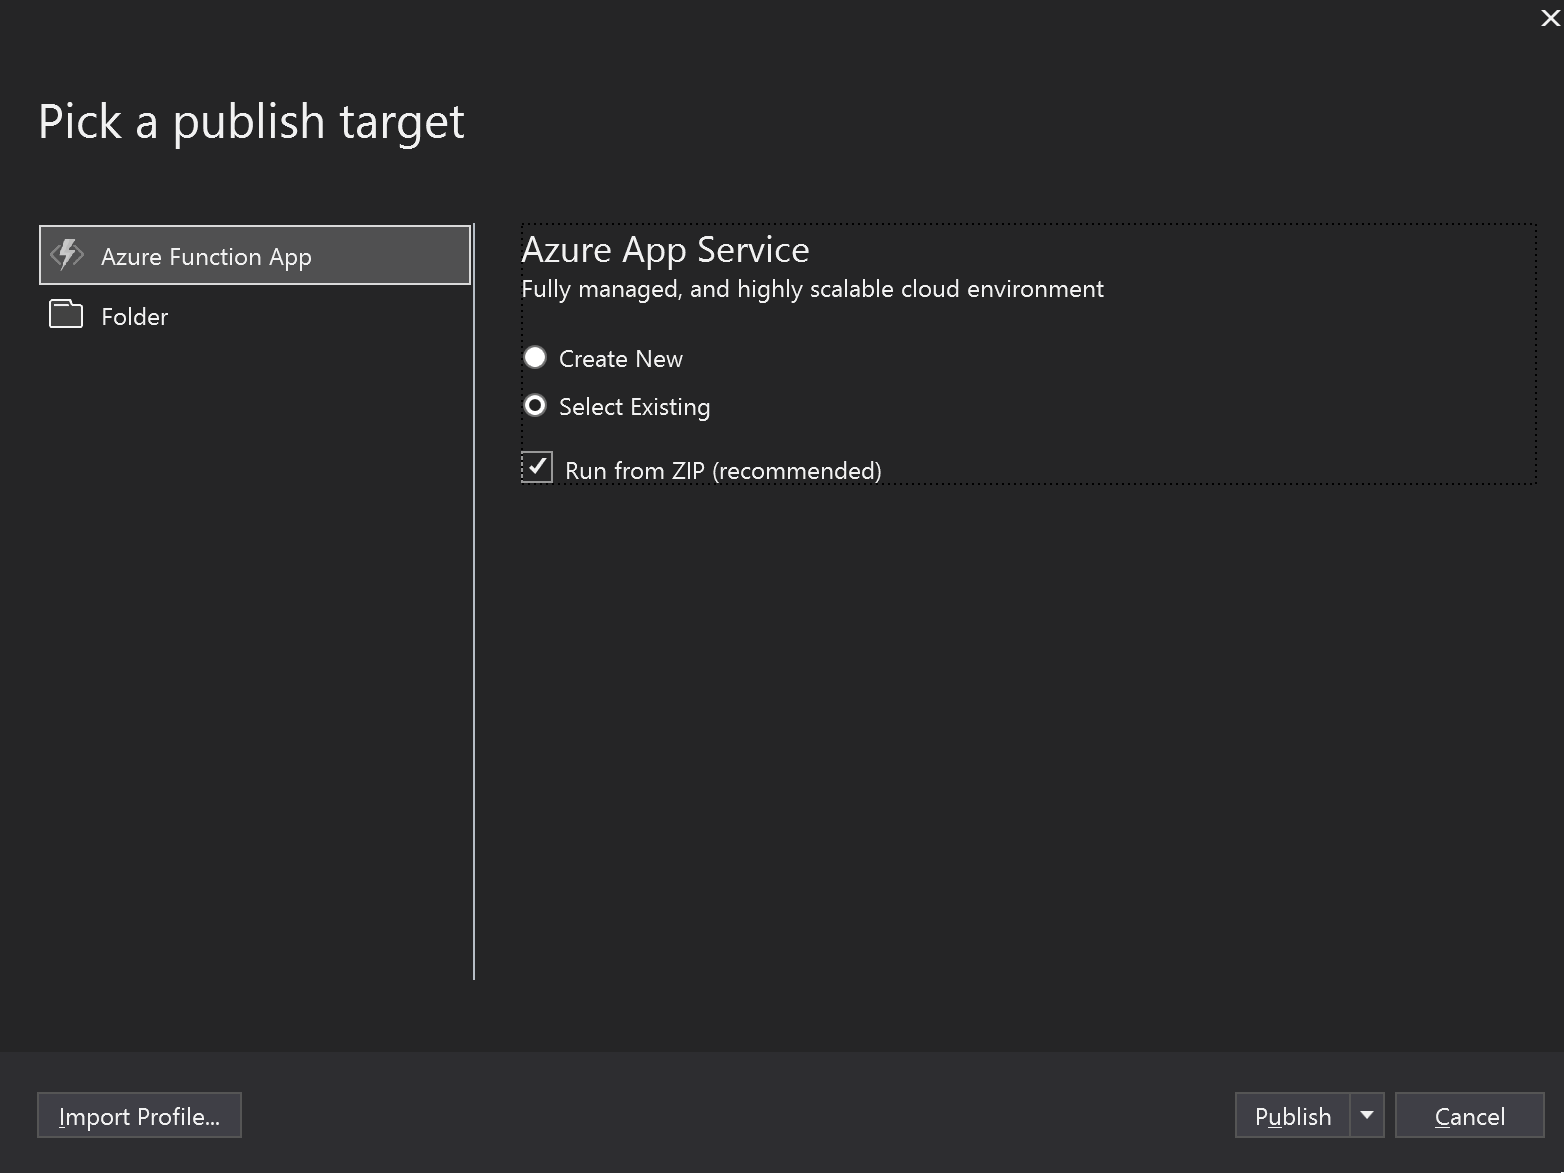
Publishing the function
Publishing the function is done through Visual Studio. Simply right click your project in the Solution Explorer and choose "Publish...". Select "Create a new one" if you haven't already deployed one, otherwise deploy to an existing Function App and in both cases tick the box "Run from ZIP".
Once the App is published we can add the authentication part using Azure AD. This is pretty straight forward and very well documented: https://docs.microsoft.com/en-us/azure/app-service/configure-authentication-provider-aad
App Service Plans
Now would also be the time to deploy your App Service Plans. If you are copy pasting, make sure you name them "ASP-Standard" and "ASP-Performance", place them both in a Resource Group called "rg-WebApps". If you are going with custom names, make sure to modify the Automation Runbooks with corresponding parameters before you publish them.
Azure Automation
To deploy the Runbooks we need an Automation Account which you can deploy through the Azure Portal (https://docs.microsoft.com/en-us/azure/automation/automation-create-standalone-account).
Once you have your Automation Account ready, browse to it and click on "Runbooks" -> "Create a Runbook". Make sure you select "PowerShell" as the language.
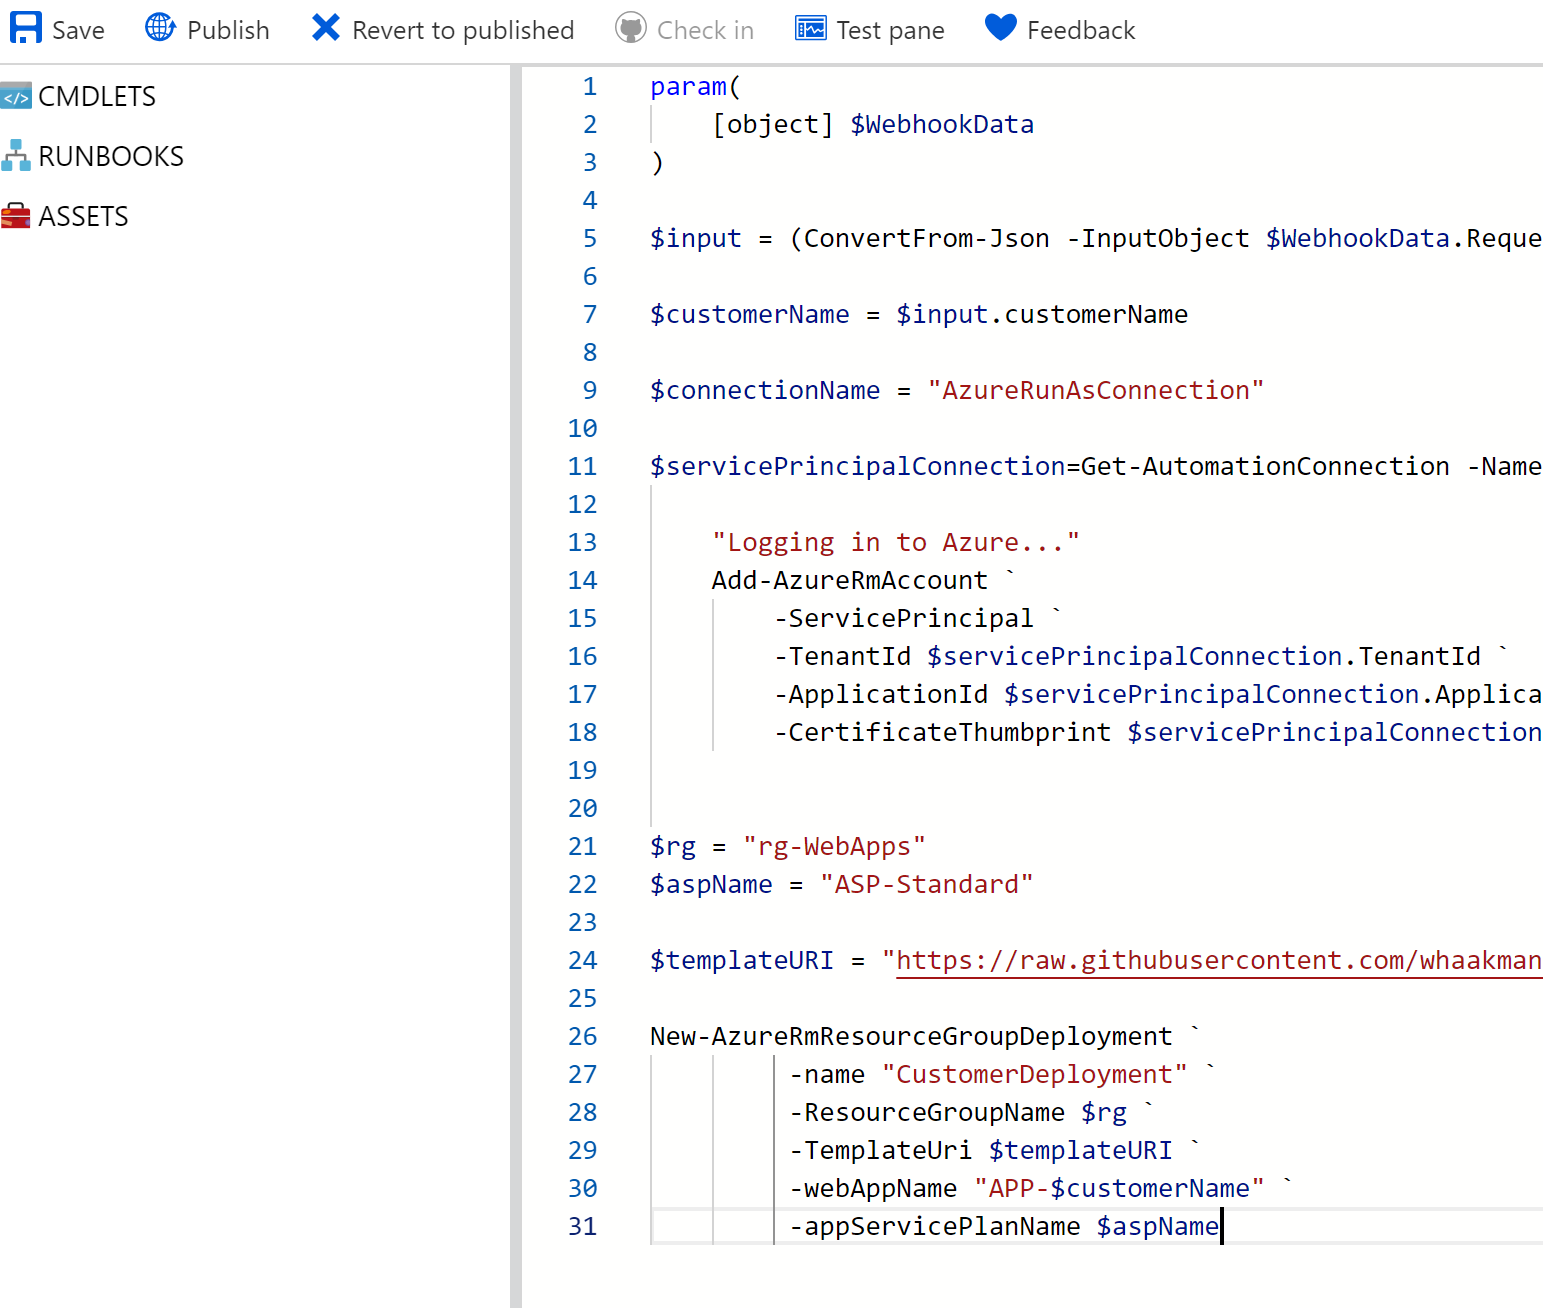
I've used the following PowerShell code for my Runbook. Tote the "templateURI" which you can obviously change to your own liking as long as you pass the right parameters. I've hardcoded the Resource Group and the App Service Plan name but this can also be value coming from the Azure Function, depending on where you want to build your logic.
deployStandardApp.ps1
param(
    [object] $WebhookData
)

$input = (ConvertFrom-Json -InputObject $WebhookData.RequestBody)

$customerName = $input.customerName

$connectionName = "AzureRunAsConnection"

$servicePrincipalConnection=Get-AutomationConnection -Name $connectionName

    "Logging in to Azure..."
    Add-AzureRmAccount `
        -ServicePrincipal `
        -TenantId $servicePrincipalConnection.TenantId `
        -ApplicationId $servicePrincipalConnection.ApplicationId `
        -CertificateThumbprint $servicePrincipalConnection.CertificateThumbprint


$rg = "rg-WebApps"
$aspName = "ASP-Standard"

$templateURI = "https://raw.githubusercontent.com/whaakman/DeploymentAutomation/master/templates/webapp.json"

New-AzureRmResourceGroupDeployment `
         -name "CustomerDeployment" `
         -ResourceGroupName $rg `
         -TemplateUri $templateURI `
         -webAppName "APP-$customerName" `
         -appServicePlanName $aspName
Create the Runbook by clicking "Save" and "Publish".
Once published you can return to your Runbook "main blade" and you will have the option "Add webhook". This is exactly what we need and will provide the URL we need to configure in the Function App settings. Please note that you can only request the URL once, so store it somewhere safe for now.
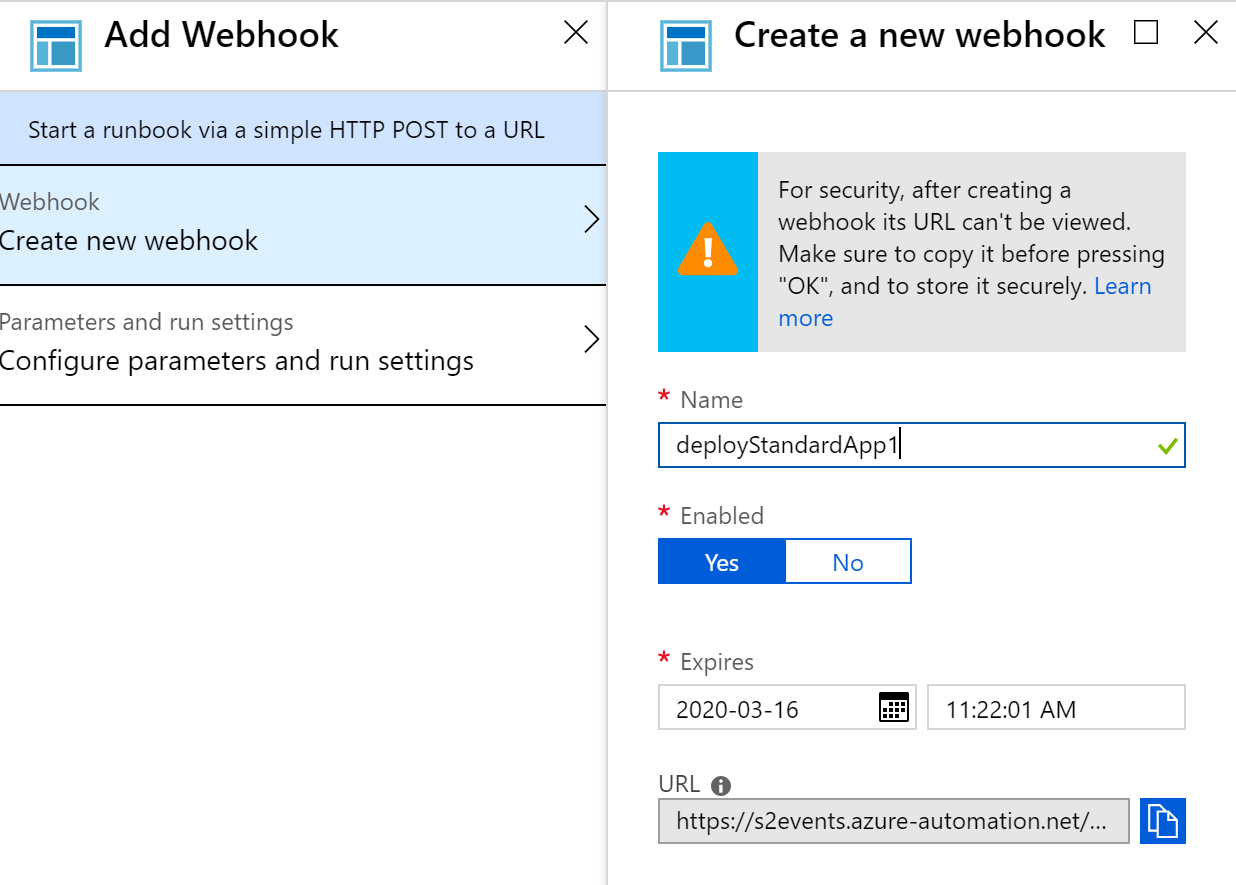
Repeat the steps for the "Performance" Runbook and make sure you change the parameters to point to the right App Service Plan :) code can be found at https://github.com/whaakman/DeploymentAutomation/tree/master/runbooks
You should end up with similar configuration:

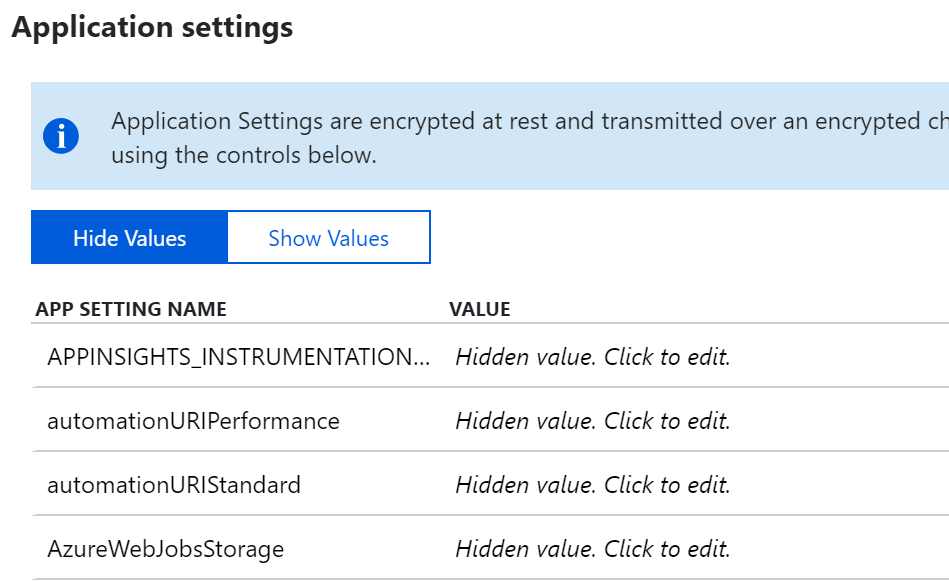
Configure the App Settings
Browse to the Function App and on the main blade browse to "Application Settings". Configure the settings for automationURIStandard and automationURIPerformance, use the URI's created when configuring the Webhooks and save the settings.
Right, everything is configured. Let's see this in action.
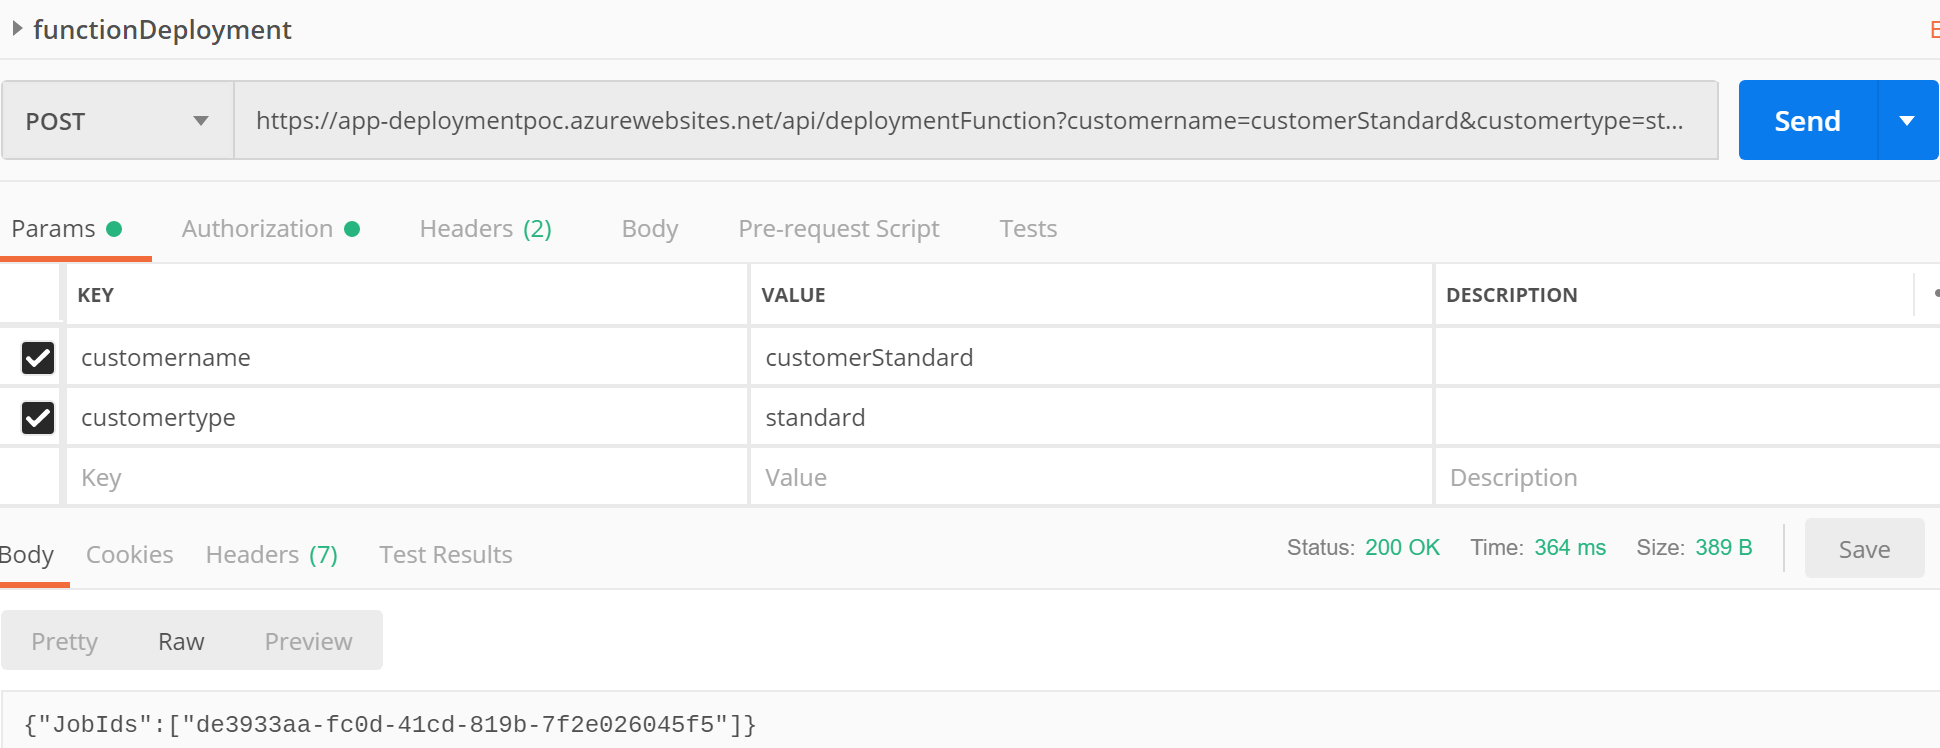
The Result
Your function should be accessible through https://yourfunctionapp.azurewebsites.net/api/deploymentFunction and it takes two parameters. I'm using Postman to execute my query but you can just as well do this from PowerShell or any other code. If you have configured Azure AD Authentication, make sure you understand how tokens are requested and exchanged as this will help you a whole lot when writing code (I learned this the hard way..).
I'm passing the two parameters in the body of the request, after sending the request you should receive a JobID which corresponds with the Runbook job that has been kicked of:
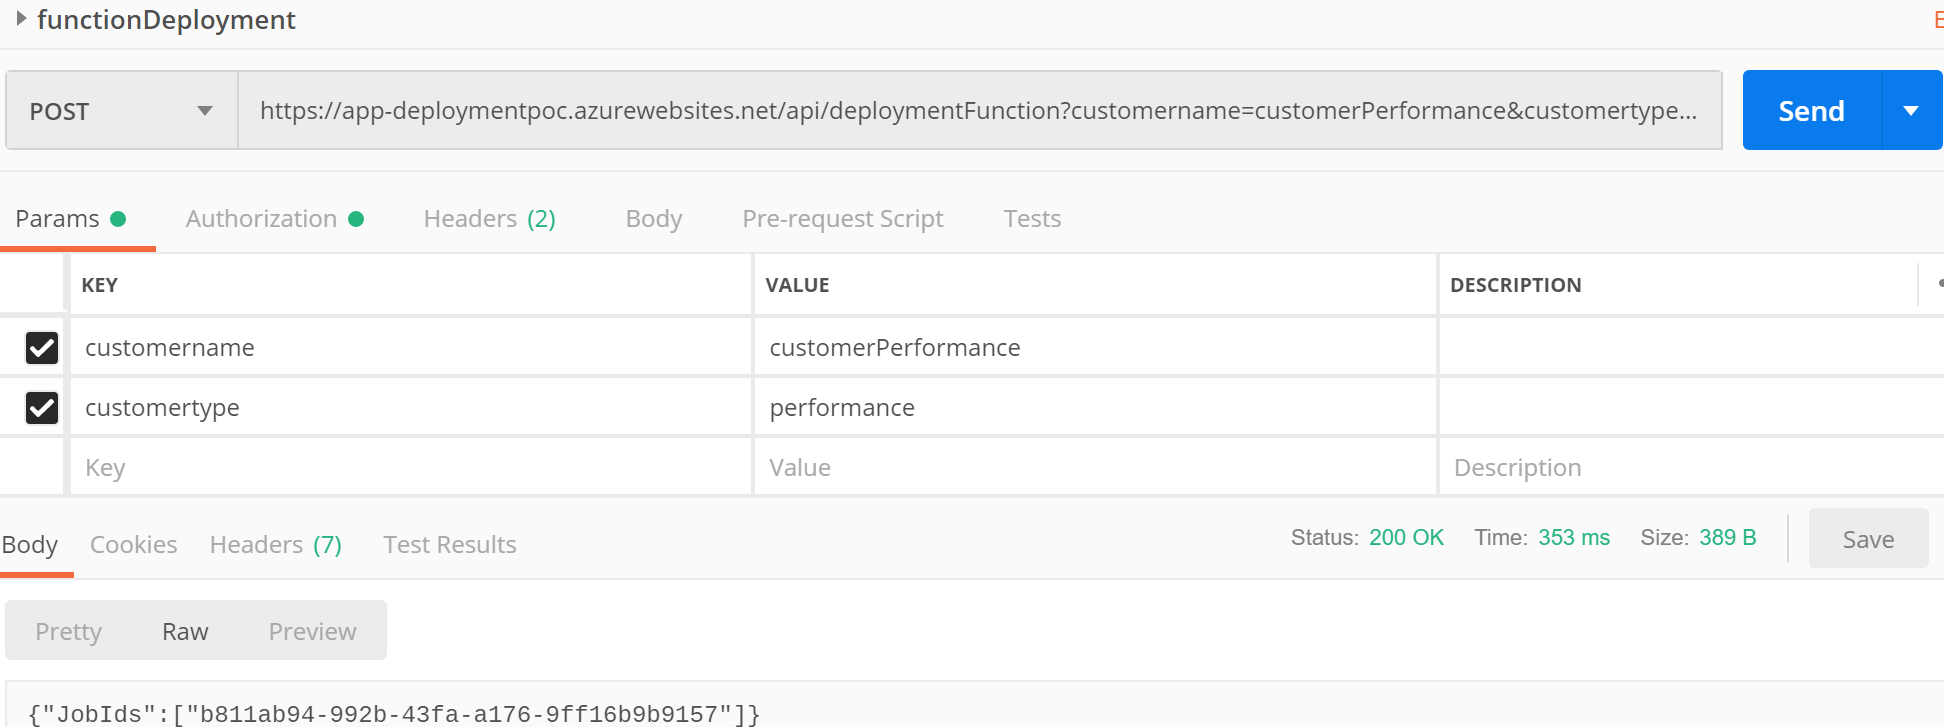
After changing the parameters to deploy a Web App to the "Performance" App Service plan, the same should happen.
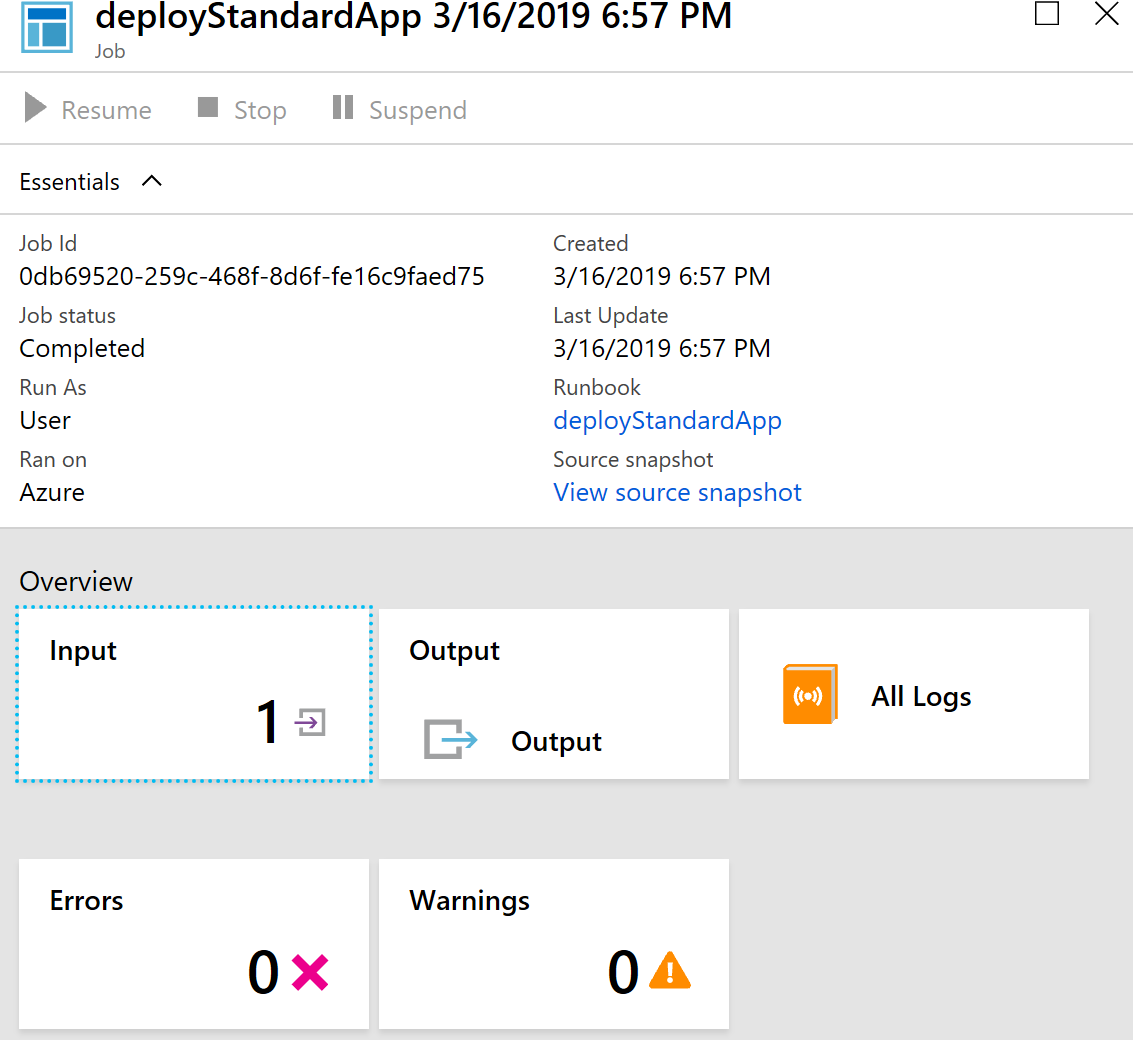
My runbooks should both have running or completed job with the corresponding JobID. Note that this is also the place to start debugging when stuff goes wrong. Simply click "Input" to investigate the received data through the webhook or "Output" to see what the Runbook has been up to.
And finally there should be two Web Apps, both running in different App Service Plans.

That's it, we've implemented the design by creating a dependable endpoint, secure it with Azure AD and you can now safely provide your teams, customers or applications access to an API that will coordinate the resource provisioning process.