Container Image Security part 4: Azure Policy, Ratify and Notation

We have built our images, we scanned for vulnerabilities, and we even verified the integrity of running container images. But what if we want to do it a little differently? What if we want to be more restrictive and not allow a single deployment of a container image that is not signed by us? We can absolutely do that with technologies such as Azure Policy, Ratify and Notation.
This is a blog post I have been looking to write for a long time as I am very excited about these technologies. I know it is somewhat of a long post and I considered splitting it up. However, my challenge to understand this and run leverage these features was partially because of the different documentation sets and vendors that come together in this single solution.
In this post, components from previous articles come together, it is definitely worth reading these as it will give you an understanding of where we are coming from and where this will eventually lead.
Previous articles:
Container Image Security Part 1: Azure Container Registry
Container Image Security Part 2: Building & The pipeline
Container Image Security Part 3: Image Integrity and Azure Policy
Prerequisites
Before we get started, we need to make sure we have our prerequisites in place.
Most importantly, the command and tools we will use (Notation) primarily run on Linux. Therefor it's highly recommended you use WSL and Windows Terminal (let's be honest, you're already using this of course.
If you are following the series of articles and performed the steps in Container Image Security Part 3: Image Integrity and Azure Policy then we have a little cleaning up to do. During the course of this post, we will deploy a customer Azure Policy definition and manually install Ratify in our Azure Kubernetes Service Cluster. This currently conflicts with the Image Integrity feature we used in the previous article.
az aks update -g rg-aks-wesh02 -n aks-wesh02 --disable-image-integrity
az policy assignment delete --name 'deploy-trustedimages'
Additionally, we will need an Azure Key Vault as we are going to store our Self-Signed Certificate which Ratify will leverage.
Additionally, we need an Azure Key Vault. We can follow the documentation but deploying one is as easy as:
az keyvault create --name "kv-aks-wesh02" --resource-group rg-aks-wesh02 --location "westeurope"If you have not followed the previous article, we also need to ensure the Azure Policy Gatekeeper implementation supports requests to external data sources (Ratify in this case). For that we need to register the AKS-AzurePolicyExternalData feature:
az feature register -n AKS-AzurePolicyExternalData --namespace Microsoft.ContainerServiceNow that we have that out of the way, we can start with setting up Notation to sign our images.
Signing the container image
What we will do is install Notation, the Azure Key Vault plugin and configure both to sign and store our certificates.
curl -Lo notation.tar.gz https://github.com/notaryproject/notation/releases/download/v1.0.1/notation_1.0.1_linux_amd64.tar.gz
tar xvzf notation.tar.gz
sudo cp ./notation /usr/local/bin

mkdir -p ~/.config/notation/plugins/azure-kv
curl -Lo notation-azure-kv.tar.gz \
    https://github.com/Azure/notation-azure-kv/releases/download/v1.0.1/notation-azure-kv_1.0.1_linux_amd64.tar.gz

tar xvzf notation-azure-kv.tar.gz -C ~/.config/notation/plugins/azure-kv

notation plugin ls
The last command should return proof that the Azure Key Vault plugin for Notation is installed and confirm Notation is working in the first place. More elaborate examples and explanations here.
Next, we need to set up our environment variables. If you're following the Microsoft Documentation on using Notation to sign container image, please note that the variables used there are a prerequisite when following the Ratify documentation to configure Ratify on AKS.
We will now set up the variables we need to reference our Azure Container Registry and the details for our certificate and images. In this example we are using the existing net-monitor demo as documented. However, you are free to use your own Dockerfile.
AKV_NAME=kv-aks-wesh02

CERT_NAME=wesleyhaakman-org
CERT_SUBJECT="CN=wesleyhaakman.org,O=Notation,L=Seattle,ST=WA,C=US"
CERT_PATH=./${CERT_NAME}.pem

export ACR_NAME=acrdemowes001
export REGISTRY=$ACR_NAME.azurecr.io

export REPO=net-monitor
export TAG=v1
export IMAGE=$REGISTRY/${REPO}:$TAG
export IMAGE_SOURCE=https://github.com/wabbit-networks/net-monitor.git#main
Finally, we will start to configure some resources. As we already have our Azure Key Vault deployed as part of the prerequisites, we can now add an Access Policy so that we can store our certificate.
USER_ID=$(az ad signed-in-user show --query id -o tsv)
az keyvault set-policy -n $AKV_NAME --certificate-permissions create get --key-permissions sign --object-id $USER_ID
This provides our current user (logged in) with the appropriate permissions. Next we will create a policy with the following content and store it in a JSON file. In my case I stored the following content as wesleyhaakman-org.json
cat <<EOF > ./wesleyhaakman-org.json
{
    "issuerParameters": {
    "certificateTransparency": null,
    "name": "Self"
    },
    "keyProperties": {
      "exportable": false,
      "keySize": 2048,
      "keyType": "RSA",
      "reuseKey": true
    },
    "secretProperties": {
      "contentType": "application/x-pem-file"
    },
    "x509CertificateProperties": {
    "ekus": [
        "1.3.6.1.5.5.7.3.3"
    ],
    "keyUsage": [
        "digitalSignature"
    ],
    "subject": "$CERT_SUBJECT",
    "validityInMonths": 12
    }
}
EOF
Now we can create our certificate with the help of Azure Key Vault and store it there as well. As a parameter we provide the contents of our JSON file.
az keyvault certificate create -n $CERT_NAME --vault-name $AKV_NAME -p @wesleyhaakman-org.jsonLet's build that image and sign it! We will execute the following commands in order (now you know why we needed all those variables 😄).
DIGEST=$(az acr build -r $ACR_NAME -t $REGISTRY/${REPO}:$TAG $IMAGE_SOURCE --no-logs --query "outputImages[0].digest" -o tsv)
IMAGE=$REGISTRY/${REPO}@$DIGEST

KEY_ID=$(az keyvault certificate show -n $CERT_NAME --vault-name $AKV_NAME --query 'kid' -o tsv)

# SIGN IT!
notation sign --signature-format cose --id $KEY_ID --plugin azure-kv --plugin-config self_signed=true $IMAGE
This will store a signed image in our Azure Container Registry. Please note that if you already have an image stored there, we just need to get the digest information that you can pull using az acr repo show with the appropriate parameters to your repository and then update the $IMAGE variable with the correct repository, image name and digest.
Using notation ls $IMAGE we can now verify if our image is signed.

Okay, that was the first part, we need to move on and configure Ratify.
Configuring Ratify
On to Ratify! First, we need some variables again as we will be deploying plenty of configurations.
export IDENTITY_NAME=ratifyidentity
export GROUP_NAME=rg-aks-wesh02
export ACR_GROUP_NAME=rg-acr
export SUBSCRIPTION_ID=<Your SubID>
export TENANT_ID=<Your TenantID>
export AKS_NAME=aks-wesh02
export RATIFY_NAMESPACE=gatekeeper-system
export VAULT_URI=$(az keyvault show --name ${AKV_NAME} --resource-group ${GROUP_NAME} --query "properties.vaultUri" -otsv)
export CERT_NAME=wesleyhaakman-org
export AKV_NAME=kv-aks-wesh02
export AKS_OIDC_ISSUER="$(az aks show -n ${AKS_NAME} -g ${GROUP_NAME} --query "oidcIssuerProfile.issuerUrl" -otsv)"
In the previous post Container Image Security Part 3: Image Integrity and Azure Policy we have already enabled our cluster to support OIDC. It is now time to use it and we will create a Workload Federated Identity.
az identity create --name "${IDENTITY_NAME}" --resource-group "${GROUP_NAME}" --location "${LOCATION}" --subscription "${SUBSCRIPTION_ID}"

export IDENTITY_OBJECT_ID="$(az identity show --name "${IDENTITY_NAME}" --resource-group "${GROUP_NAME}" --query 'principalId' -otsv)"
export IDENTITY_CLIENT_ID=$(az identity show --name ${IDENTITY_NAME} --resource-group ${GROUP_NAME} --query 'clientId' -o tsv)
Rather sooner than later, the Managed Identity will appear in the Resource Group that your AKS Cluster is deployed to.
Next, we will provide our identity access to the Azure Container Registry:
az role assignment create \
--assignee-object-id ${IDENTITY_OBJECT_ID} \
--role acrpull \
--scope subscriptions/${SUBSCRIPTION_ID}/resourceGroups/${ACR_GROUP_NAME}/providers/Microsoft.ContainerRegistry/registries/${ACR_NAME}
Once the assignment is completed we create the actual federated credentials.
az identity federated-credential create \
--name ratify-federated-credential \
--identity-name "${IDENTITY_NAME}" \
--resource-group "${GROUP_NAME}" \
--issuer "${AKS_OIDC_ISSUER}" \
--subject system:serviceaccount:"${RATIFY_NAMESPACE}":"ratify-admin"
And last but not least, we provide our identity access to the Azure Key Vault we deployed earlier in this post and contains the certificate we want to use for verification.
export VAULT_URI=$(az keyvault show --name ${AKV_NAME} --resource-group ${GROUP_NAME} --query "properties.vaultUri" -otsv)

az keyvault set-policy --name ${AKV_NAME} \
--secret-permissions get \
--object-id ${IDENTITY_OBJECT_ID}
Now we breath... Don't forget to breath, we are almost there! It's time to deploy Ratify to our cluster. Remember how we had to clean up bits and pieces from our previous post regarding Image Integrity? This is why. If we do not, the Ratify Helm chart will fail as the configuration to be deployed will conflict with the preview addon for Image Integrity and Azure Policy.
helm install ratify \
    ratify/ratify --atomic \
    --namespace gatekeeper-system  \
    --set provider.enableMutation=false \
    --set featureFlags.RATIFY_CERT_ROTATION=true \
    --set akvCertConfig.enabled=true \
    --set akvCertConfig.vaultURI=${VAULT_URI} \
    --set akvCertConfig.cert1Name=${CERT_NAME} \
    --set akvCertConfig.tenantId=${TENANT_ID} \
    --set oras.authProviders.azureWorkloadIdentityEnabled=true \
    --set azureWorkloadIdentity.clientId=${IDENTITY_CLIENT_ID} \
    --set logLevel=debug
Once the installation complete (Happy Helming!). We can deploy a customer policy to Azure Policy that will ensure only signed container images that we trust can be deployed to the cluster.
custom_policy=$(curl -L https://raw.githubusercontent.com/deislabs/ratify/main/library/default/customazurepolicy.json)
definition_name="ratify-default-custom-policy"
scope=$(az aks show -g "${GROUP_NAME}" -n "${AKS_NAME}" --query id -o tsv)

definition_id=$(az policy definition create --name "${definition_name}" --rules "$(echo "${custom_policy}" | jq .policyRule)" --params "$(echo "${custom_policy}" | jq .parameters)" --mode "Microsoft.Kubernetes.Data" --query id -o tsv)

assignment_id=$(az policy assignment create --policy "${definition_id}" --name "${definition_name}" --scope "${scope}" --query id -o tsv)
Once the policy is deployed we need to wait a little bit for it to take effect but in the mean while, let's inspect the Azure Portal.
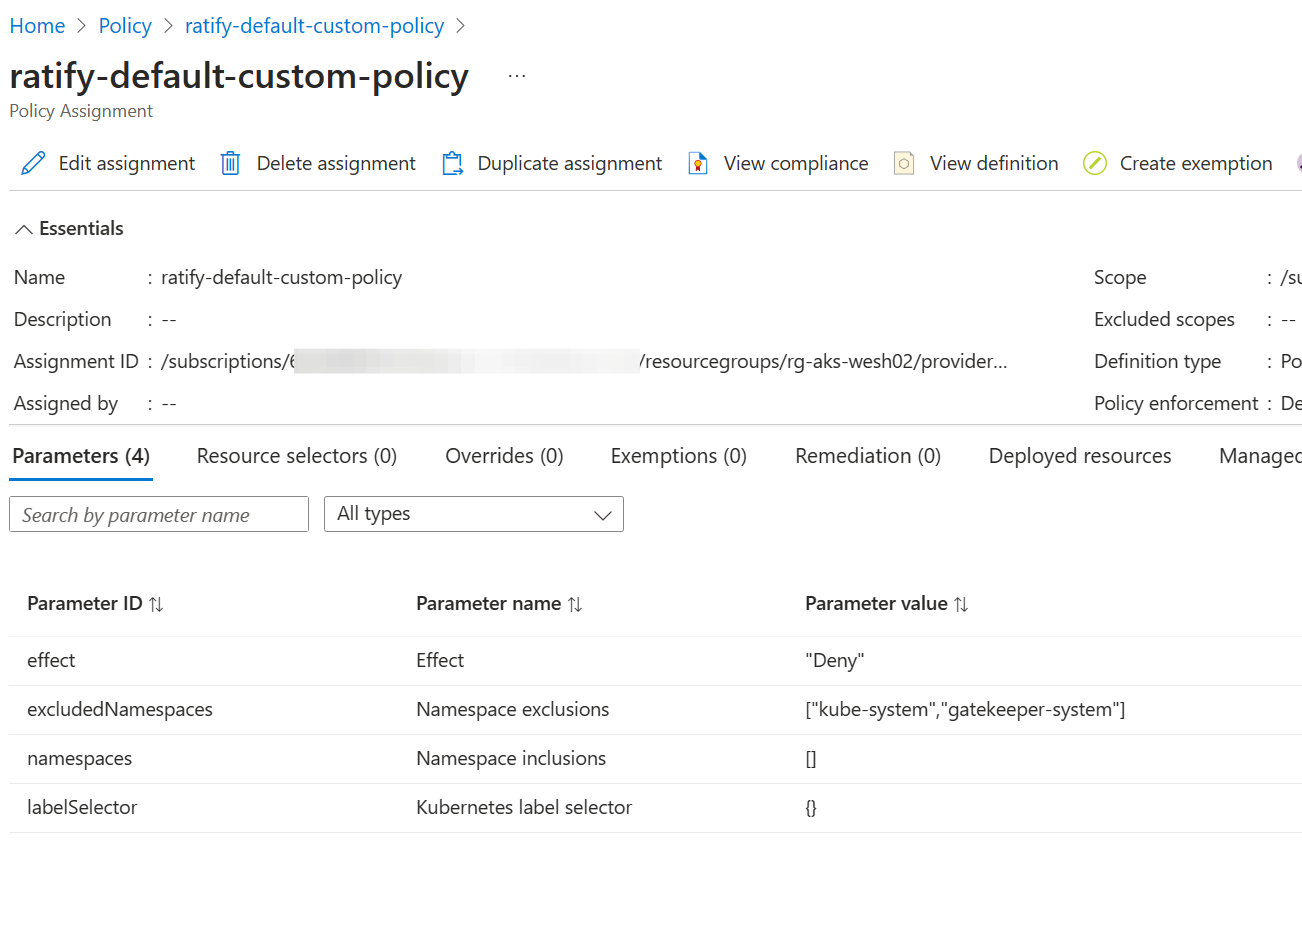
We see the policy is there. Important to note is that the policy effect is set to deny, and therefor will deny deployments containing images to our cluster when they are non-compliant. Make sure that everything you want to be excluded (namespaces or labels) are excluded!
Now that everything is up and running, let's deploy our net-monitor pod and see what happens.

Success! Our self-signed image is accepted by our admission controller. An unsigned image is not.
Wrapping up
Well, that's quite the post, I considered breaking into multiple posts but as we are bringing different technologies together, I found it is easier to group everything together.
We learned how the Gatekeeper implementation through Azure Policy can be extended with Ratify to validate container images upon admission. Where things may seem very technical and complex, it doesn't have to be. I found that becoming comfortable with these technologies and deployments over the course of a couple of days changed my mind; this needs to be a best practice for every cluster deployed.
Some technologies are still in preview but at the pace Microsoft is developing AKS and pushing many new features, this only gets better and easier!