Flashing Philips Hue lights with Azure Functions and Azure Service Health
To improve my C# and .Net Core knowledge I was looking for a hobby project. As I'm currently running a couple of Philips Hue lights I thought it'd be a nice idea connect to them using an Azure Function. The end result: Flashing lights whenever I call the API.
The goal
One could argue that sending messages directly to your Philips Hue bridge can also achieve the same goal. Yes it would but then we're just talking about turning the lights on and off and set the color. What if we want to flash them in a specific color and trigger them based on an event? Azure Functions to the rescue!
Requirements
For this to work you need the following components:
- Philips Hue bridge and lights
- Azure Subscription
- Azure Function
- Connectivity from the Azure Function to your Philips Hue bridge
Note that simply exposing your Philips Hue you bridge to the internet might not be the best idea from a security perspective. If you want to run this solution for a longer period please take additional steps to secure your network and the access to the bridge.
Setting up the Philips Hue Bridge
This is pretty straight forward. You need a user to access your Hue Bridge. The process to configure that only takes a couple of minutes to complete and is well documented here. The bridge itself comes with a debugging page where you can query the available APIs to achieve this, however for documentation and reusability I used Postman as my weapon of choice.
Setting up the Azure Function
For the Azure Function you need to create a new Azure Function in Visual Studio Code. Make sure you have the following components installed:
Once you've got that installed, create a new Azure Function as described HERE. I used the following Settings:
Language: C#
Template: HTTP Trigger
Function Name: TriggerAlertLighting
Namespace: Alerting.Function
Authorization level: Function
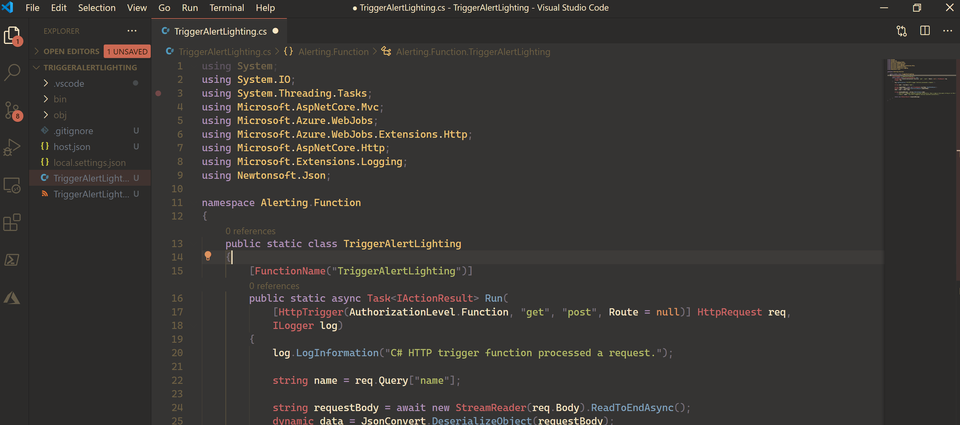
Once Visual Studio code is done scaffolding it will probably ask you to preform a restore. Click on the "Restore" button on the bottom right to make sure all packages are set up and ready for you to go. You should end up with something similar to this:

The Code
If want to skip the write-up and are looking for the complete code, it's available HERE.
Alright, everything is set up so we're ready to go. Please keep in mind that I'm not a developer as a day job so the code may be optimized here and there. Time to look at the code.
TriggerAlertLighting.cs
Let's break this down. We're going to use the already available method created for the HTTP Trigger.
public static class TriggerAlertLighting
    {
        [FunctionName("TriggerAlertLighting")]

        public static async Task<IActionResult> Run(
            [HttpTrigger(AuthorizationLevel.Function, "get", "post", Route = null)] HttpRequest req,
            ILogger log)
        {
            log.LogInformation("Received request!");

            string alert = req.Query["alert"];
            string count = req.Query["count"];

            string requestBody = await new StreamReader(req.Body).ReadToEndAsync();
            dynamic data = JsonConvert.DeserializeObject(requestBody);
            alert = alert ?? data?.alert;
            count = count ?? data?.count;

            int number;
            string responseMessage;
I want to be able to provide a color (red or green) and a count. If I request the color green with a count of 3 the light should flash green three times. For this I'm grabbing the parameters "alert" for the color and "count" for the number of flashes from the GET request. I'm writing this primarily for the GET request as I want to call this from different Azure Resources and not everything supports sending a POST and a body.
Next we'll look at processing the count as this will be parsed as a string initially.
// check if count parameter has been provided or else default to 3
            // Not happy with the nested statements but it works
            if (string.IsNullOrEmpty(count))
            {
                number = 3;
            }
            else
            {
               int tryNumber;
               bool successTryParse;
               // Check if the parameter value for count can be parsed to an int
               // If it doesn't succeed (someone provided a string), default to 3
               successTryParse = int.TryParse(count, out tryNumber);

               if(successTryParse)
                    {
                        number = tryNumber;
                    }
               else
                    {
                        number = 3;
                    }
            }
It's not the prettiest of code but what we're doing is checking if the string count is not empty and then try to parse it as a number. If either of them is unsuccessful we'll default to the number 3 for the count.
Next we will grab the App Setting that contains our URL to the Philips Hue Bridge
// Use Configuration Builder to grab required value (Hue URL)
var config = new ConfigurationBuilder().AddEnvironmentVariables().Build();
string url = config["hueURL"];

// Create HTTP Client for later use
HttpClient client = new HttpClient();
We grab this setting by creating a new ConfigurationBuilder object and use the "AddEnvironmentVariables" extension method.
In the app settings of the Azure Function App you need to create an App Setting with the key "hueURL", the value will be the address to your Philips Hue bridge including the path to the light. The URL should look similar to: http:///<ADDRESS>/api/<USER>/lights/<Light>/state.
Additionally we will also create the HttpClient we need to make the call.
Before we move on we need an object that contains all the Hue Light properties we need for this to work and a method to configure the color. Let's take a jump to the HueProperties.cs class.
HueProperties.cs
The properties should be configurable but I also want to provide a default value for the property "on", this requires a boolean value and can be true or false. Even though it should default to false upon instantiating the class, I don't want to take a risk. The reason why we need to default to false is that we want to flash the light. Basically what we'll be doing is using two HueProperties objects, one with the property "on" set to true and the other one set to false. The calls to the Hue Bridge will be done through a for loop and toggle the lights on and off.
public class HueProperties
    {

        // By default bool is set to false, but we don't want to take a chance :)
        public bool on { get; set; } = false;
        public int bri { get; set; }
        public int hue { get; set; }
        public int sat { get; set; }
Next we'll need a method to set the color as we don't really want all that code in our main class. To keep it all readable I decided to place that into a method that takes a string (color).
// Method to set the color depending on the parameter value provided. Returns the object
        public HueProperties SetColor(string color)
        {
            var properties = new HueProperties();

            if (color == "green")
            {
                properties.bri = 254;
                properties.hue = 23456;
                properties.sat = 254;
                properties.on = true;
            }

            if (color == "red")
            {
                properties.bri = 254;
                properties.hue = 908;
                properties.sat = 254;
                properties.on = true;
            }

            return properties;
        }
    }
This will return a HueProperties object based on the color provided. Adding an additional color means adding an additional block of code in the SetColor method.
Back to TriggerAlertLighting.cs.
TriggerAlertLighting.cs
We're now going to create two objects of HueProperties. One to turn the lights on, one to turn the lights off.
// Create objects for turning the lights on and off
            // Creating an "empty" object to turn off the lights (on is set to false)
            var propertiesTurnOn = new HueProperties().SetColor(alert);
            var propertiesTurnOff = new HueProperties();

            // Set the response
            responseMessage = $"Light flashed {alert}!";

            // Convert object properties to json
            var jsonTurnOn = JsonConvert.SerializeObject(propertiesTurnOn);
            var jsonTurnOff = JsonConvert.SerializeObject(propertiesTurnOff);

            // Build the body for the API call (PUT) to the Hue bridge
            var dataTurnOn = new StringContent(jsonTurnOn, Encoding.UTF8, "application/json");
            var dataTurnOff = new StringContent(jsonTurnOff, Encoding.UTF8, "application/json");
After creating the HuePoperties objects we'll also set the response message string to turn after the call is finished and create the bodies for our call to the Hue Bridge.
As I am using .Net Core I looked into using system.text.json to deal with my JSON. However, as we're using a boolean value (turn on or off) this would require writing a StringConverter which was more work than simply using Newtonsoft.Json. So that's what I went with. After the conversion we build the body and all we need to do now is build a loop and starting toggling some lights on and off!
// Turn on off for [number] amount of times. Without the delay calls go too fast for the bridge
            for (int i = 0; i < number; i++)
            {
                var response = await client.PutAsync(url, dataTurnOn);
                Task.Delay(2000).Wait();
                var response2 = await client.PutAsync(url, dataTurnOff);
                Task.Delay(2000).Wait();
            }
            // Return response message
            return new OkObjectResult(responseMessage);
I decided to go with a for loop to achieve this. I'm using the previously created HttpClient and use the PutAsync method (Philips Hue Bridge requires a PUT for this operation). Our first action is to turn on the light. The body for that is stored in "dataTurnOn" so that's what we'll send first.
Next we have to wait for 2 seconds before turning it off again. I found that doing this any faster will send the calls so fast that the light just remains in a turned off state. Keep in mind that the Hue Bridge also needs to communicate with the actual light.
After the short delay we send the body stored in "dataTurnOff" to turn the light off and we repeat this process number amount of times.
Finally we're returning the response message to whoever send the request to the Azure Function. Now we're ready to publish the function. You can do this to an existing Azure Function app or use Visual Studio Code to create a new one. Documentation on how to achieve that can be found here. Remember to set the App Setting "hueURL" if you're going with the option to deploy a new Function App.
The function can be called using the function URL, the correct path to your function, the properties and the function key like so:
https:///<FunctionAppURI>/api/TriggerAlertLighting?alert=<COLOR>&count=<COUNT>&code=<FUNCTIONKEY>
Connecting to Azure Services
We now have a working function and we're ready to connect some Azure Services. We'll do this using an Action Group. Let's take Azure Service Health as an example. It's a fairly straight forward process.
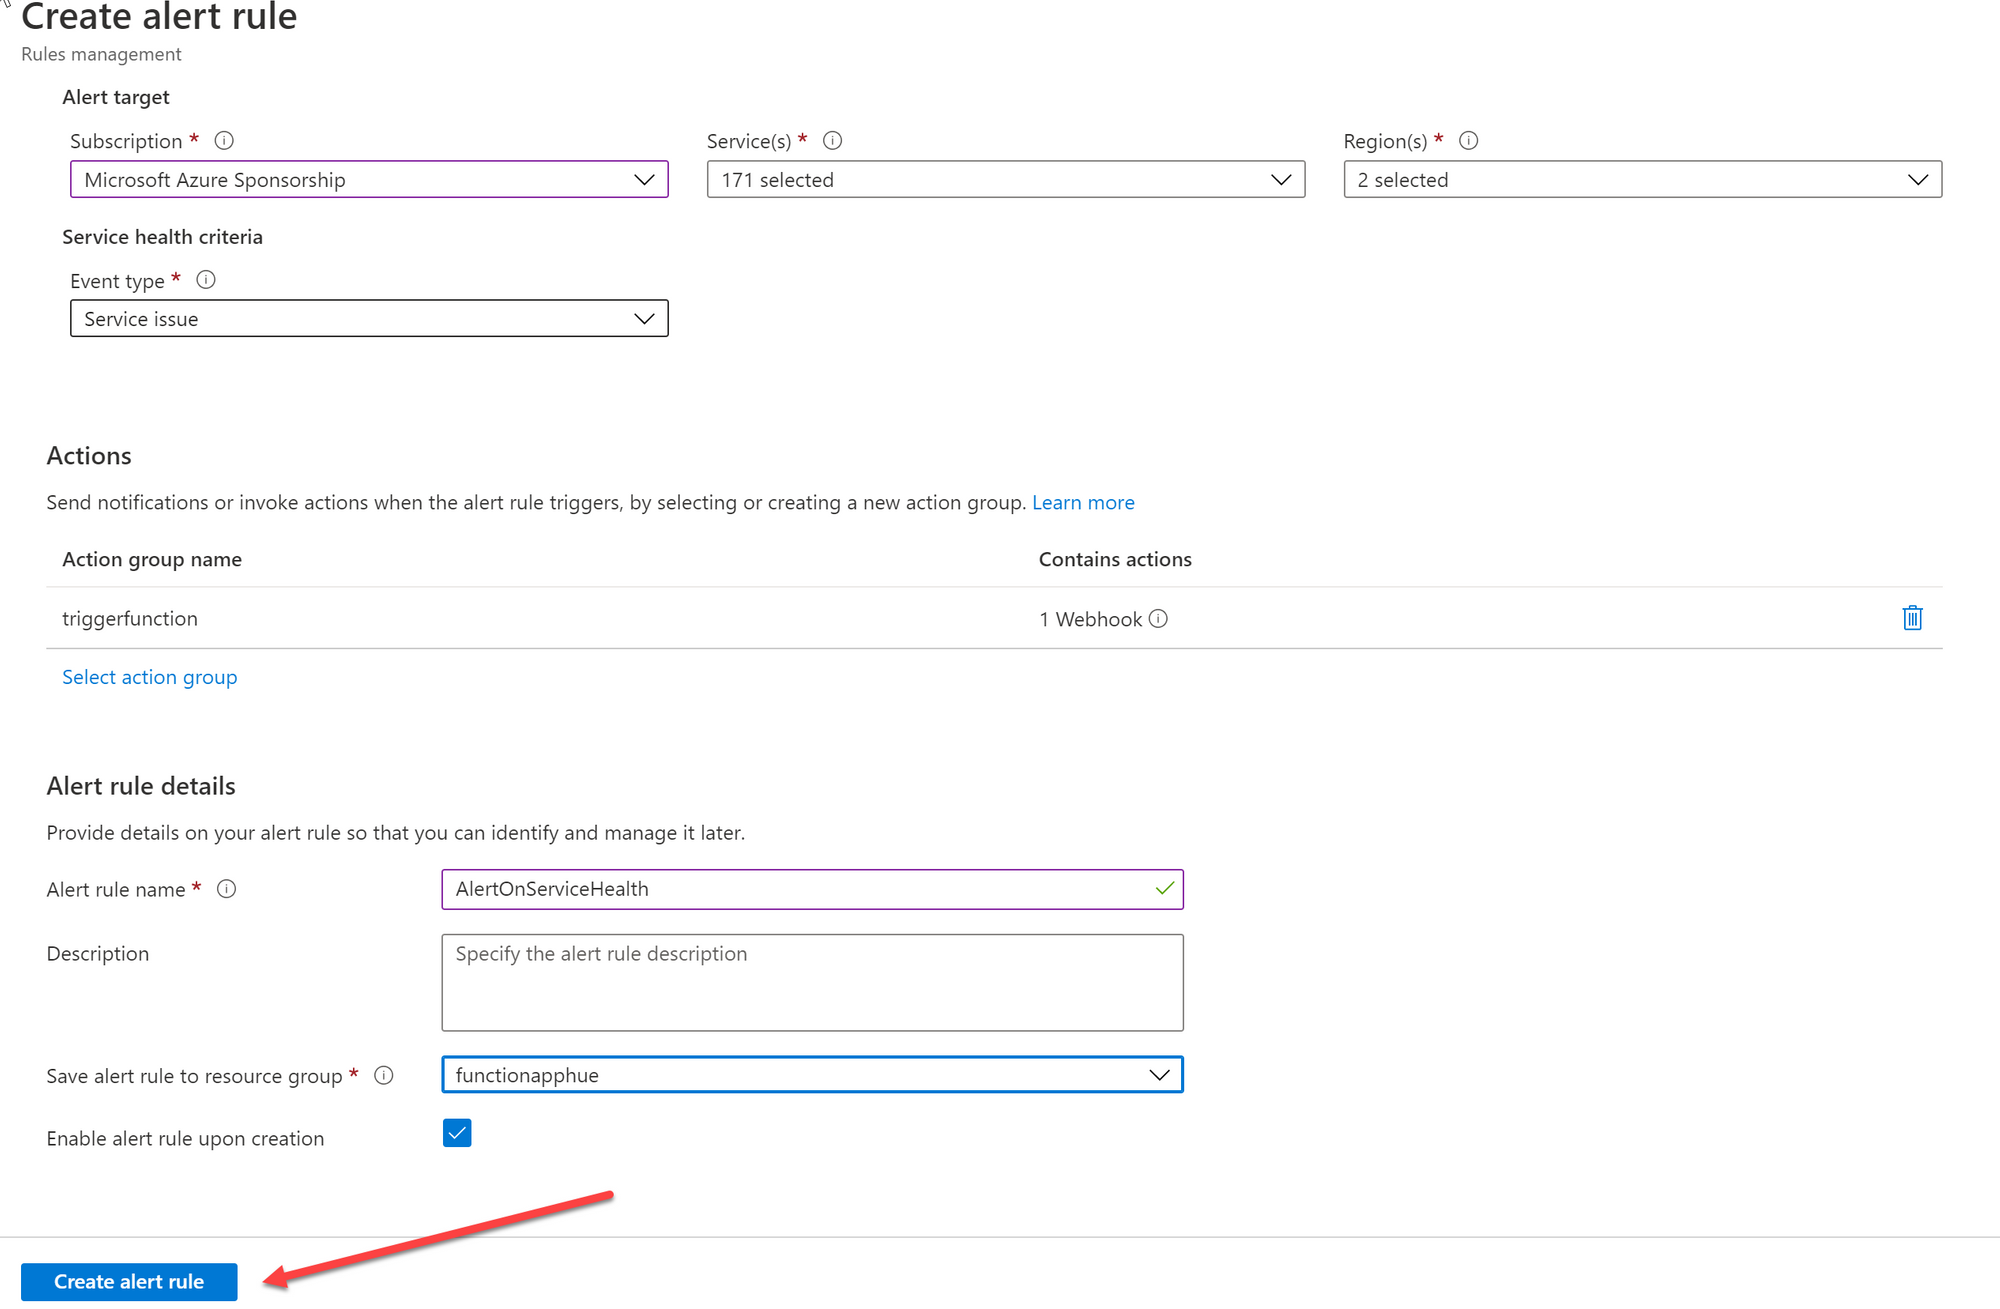
Open up the Azure Portal and browse to Azure Service Health. Here you have the option to create a new alert.
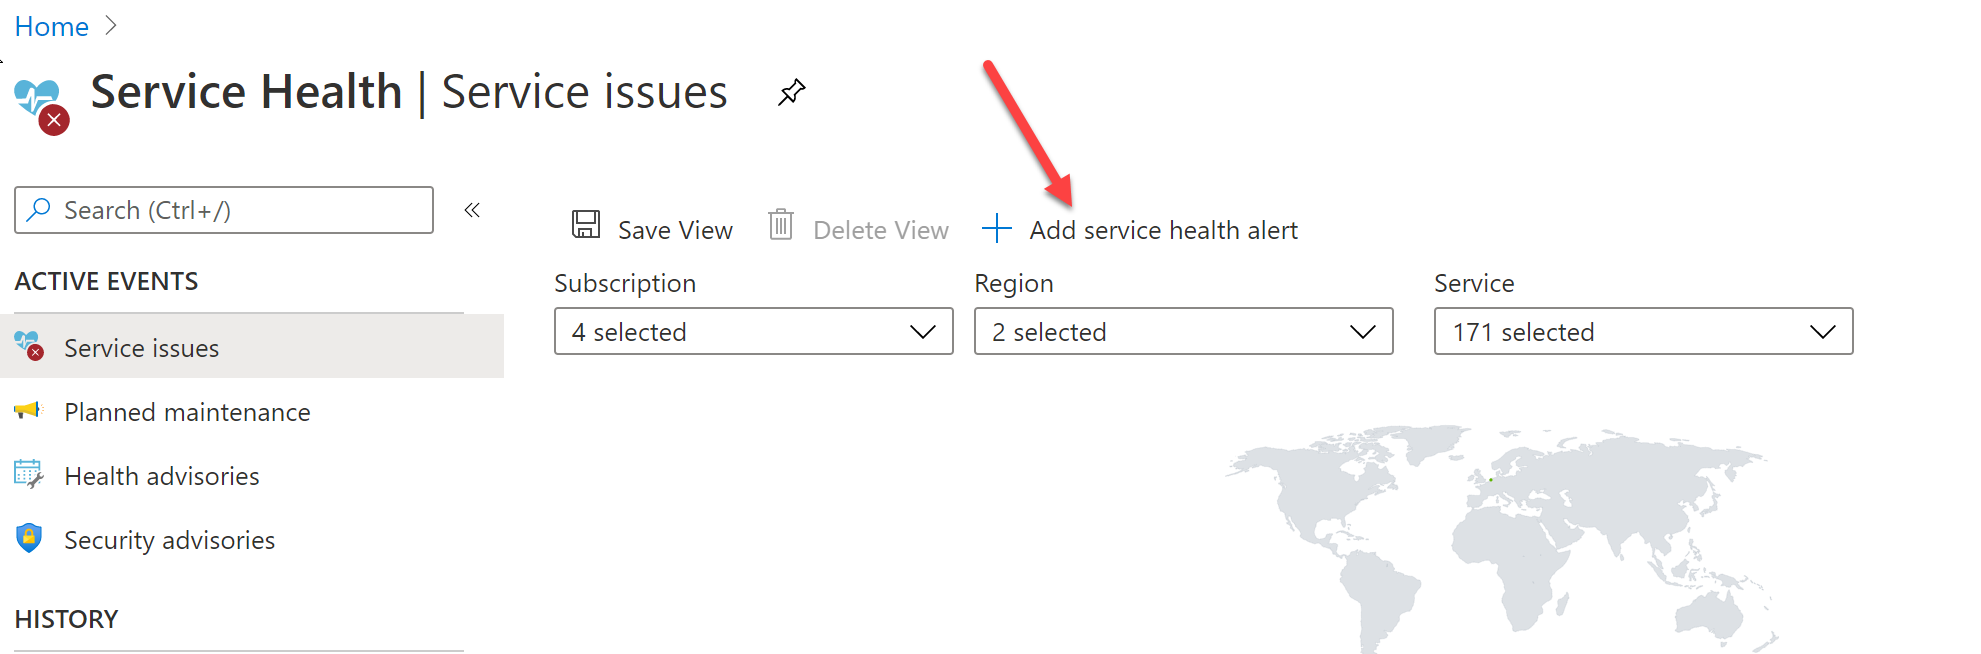
Next we'll choose the subscription, services, regions and event types that we want receive alerts for. Then click on "Select Action Group".
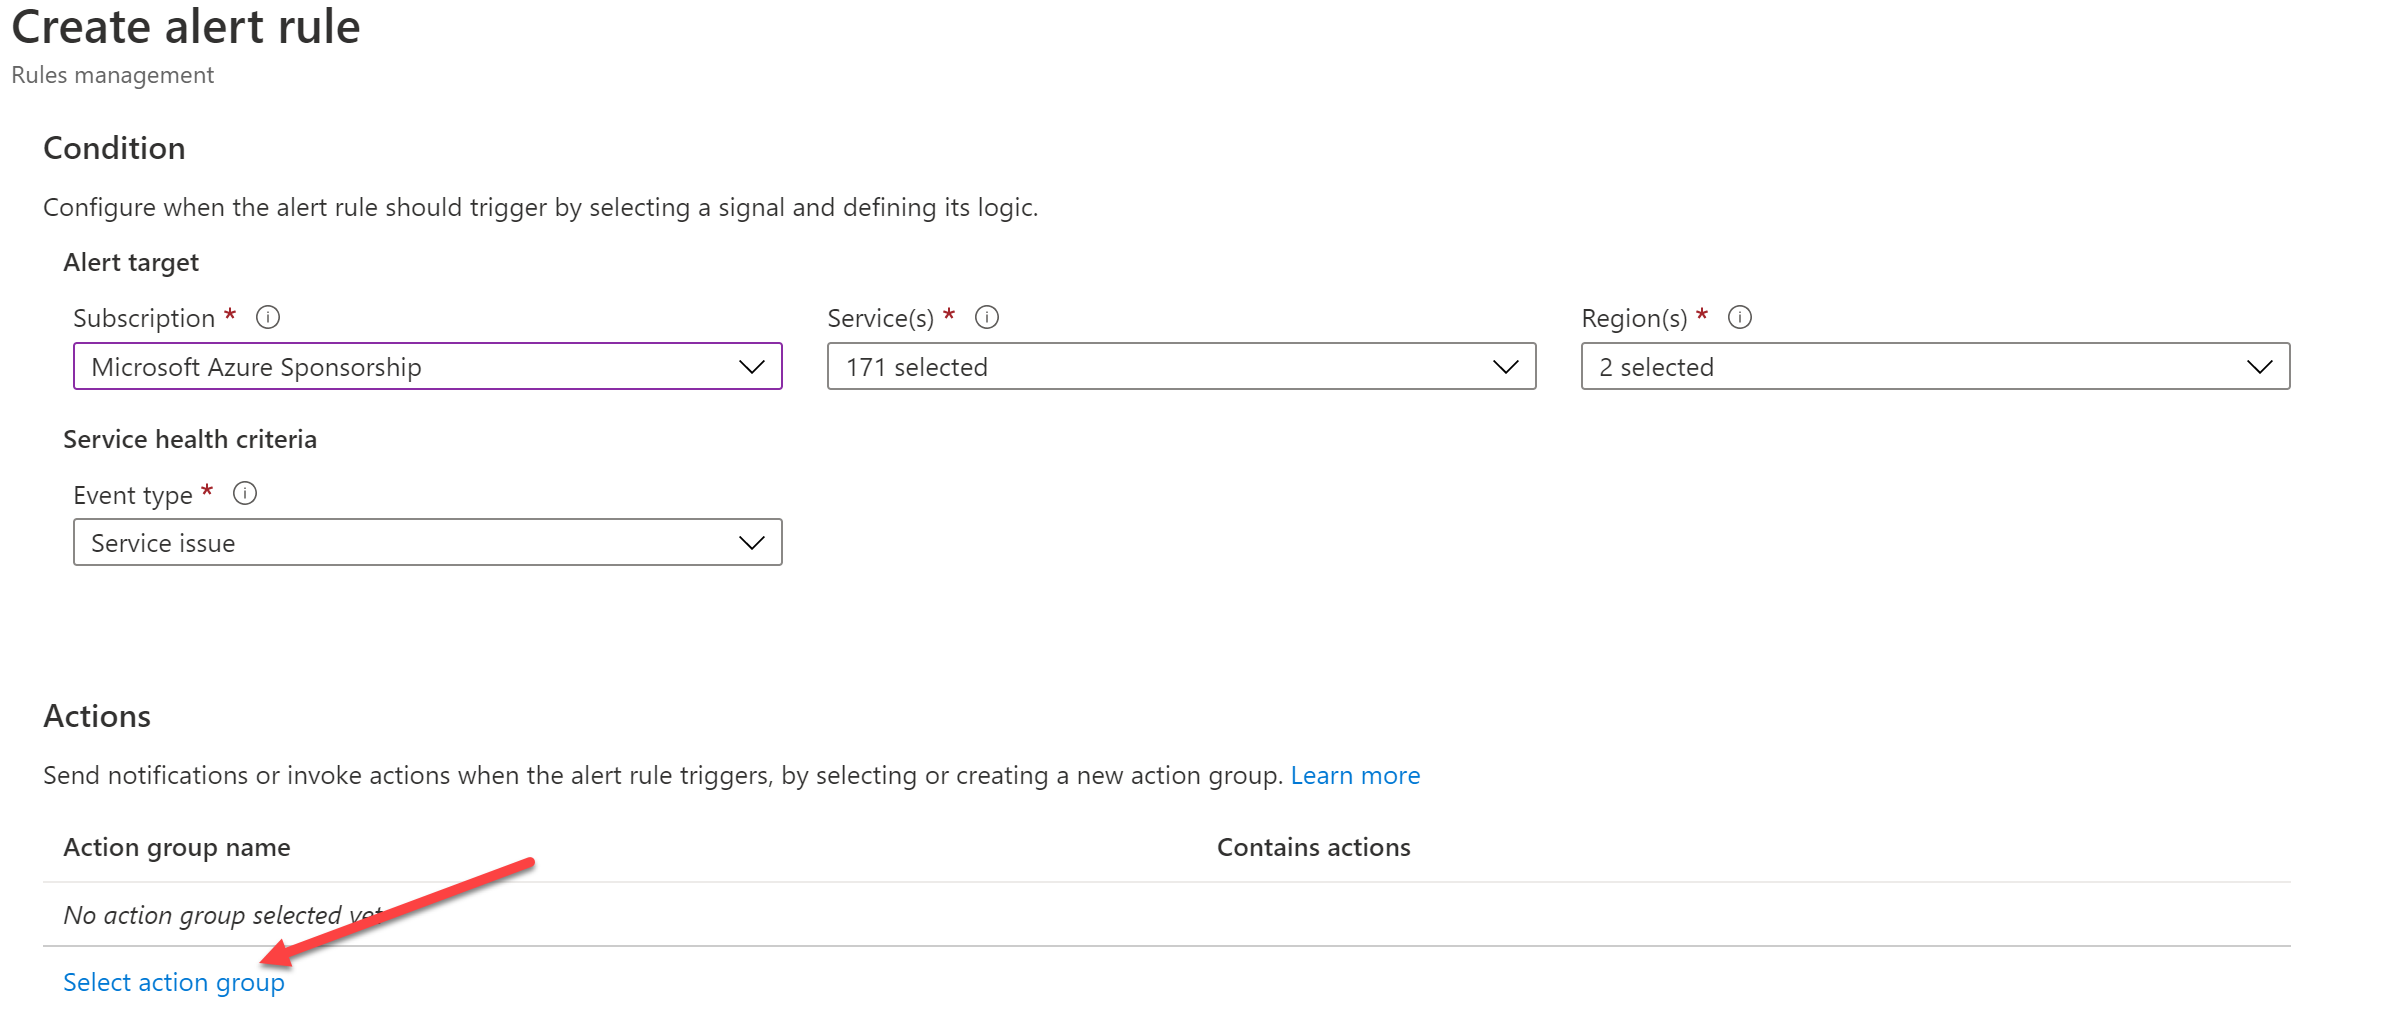
I configured a new Action Group for this specific scenario. If you choose to do the same click on "Create New Action" group once the tab pops up.
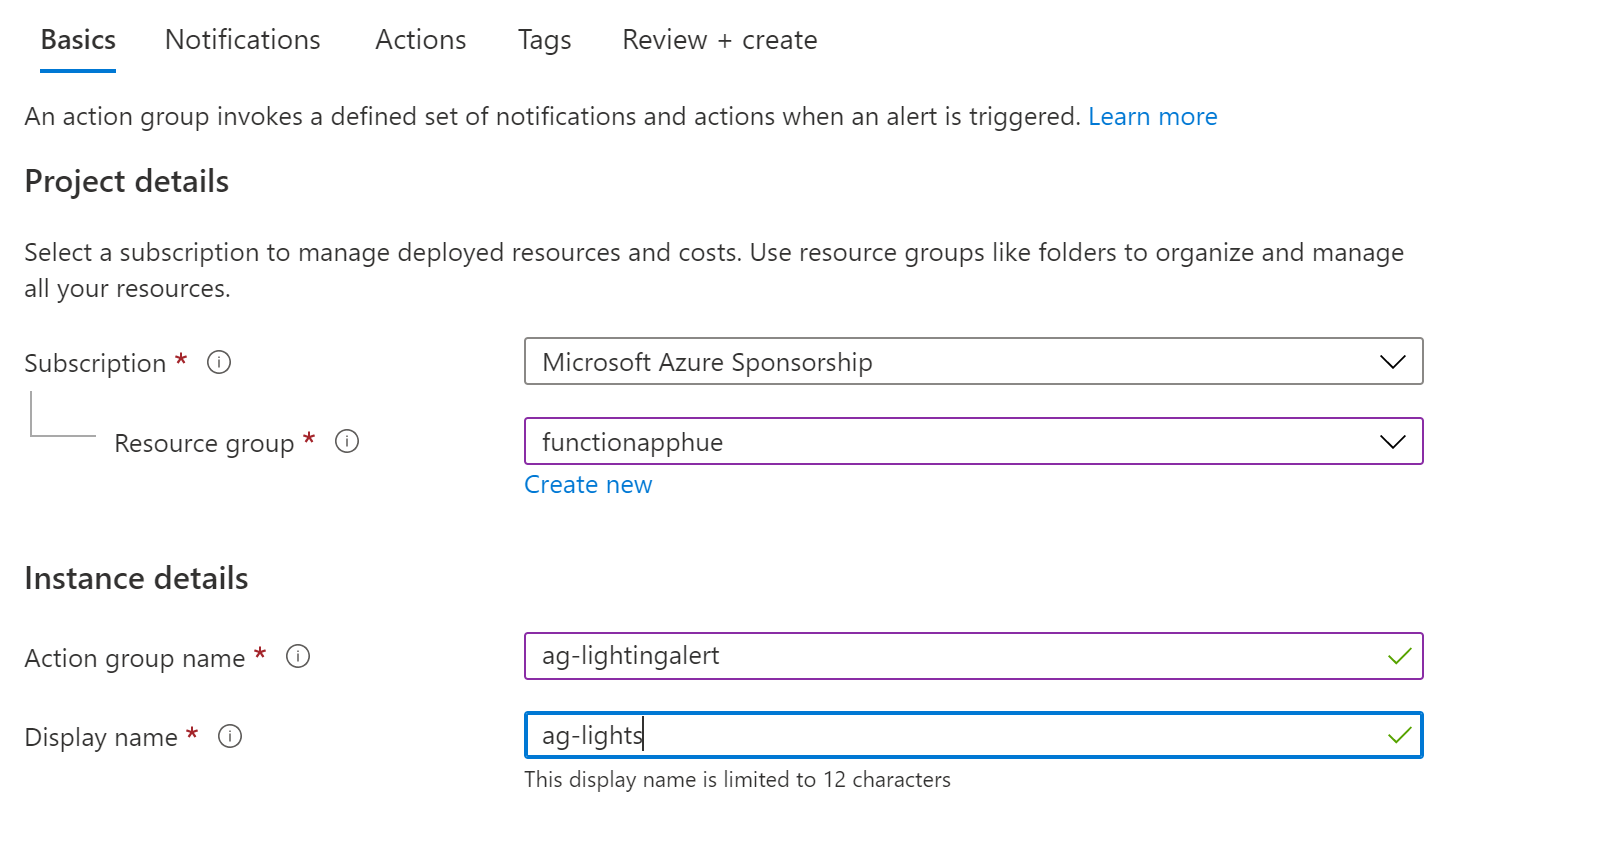
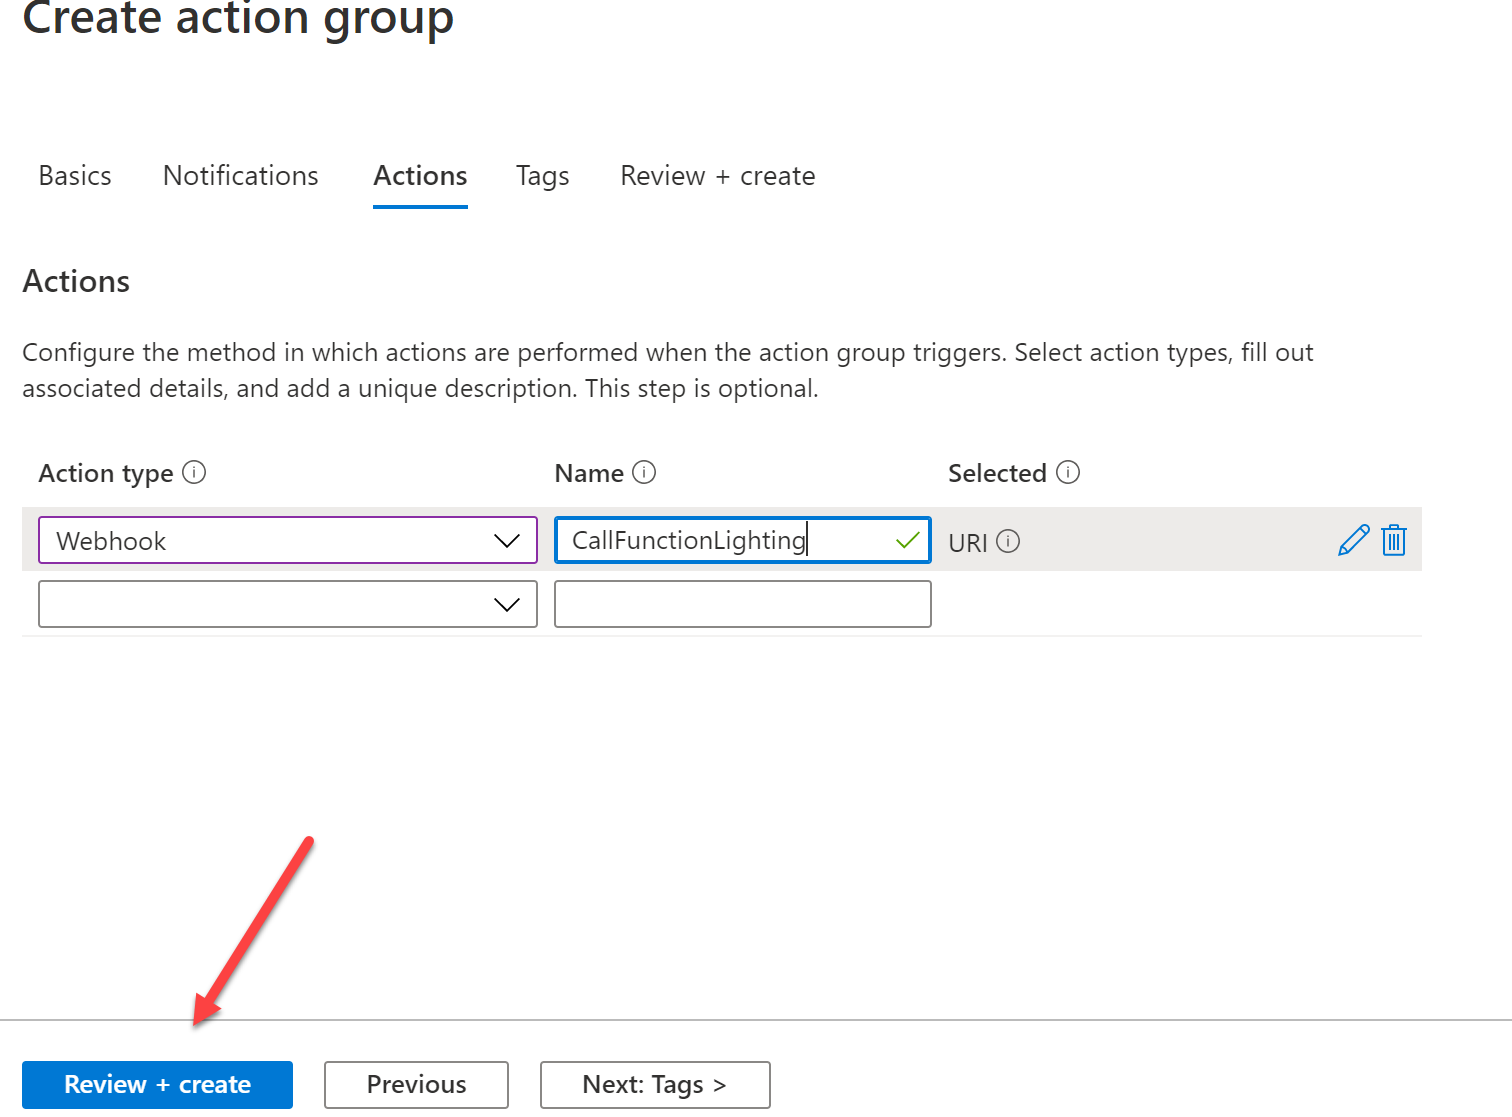
Provide the required information. For this scenario I'm storing my Action Group in the same Resource Group as my Function. Once you've done that click on "Actions" to open up the action tab.
The function is not grabbing any common schema or accepts that (improvemnet for later). Because of that we don't select "Azure Function" as an action type but we go with a "Webhook" instead. Once the tab for the Webhook pops up, paste your function URL including the color, count and function key.

Click on "OK". Name the call and then click on "Review + Create".
Once the Action Group has been created, you are returned to the blade to finalize the creation of your alert rule. Finish up with the last details (name your alert) and create the alert.
And that's it!
The result
You can use this for a lot of different things. Maybe you want to toggle your lights when you receive an email or connect it to other Smart Home devices (motion detectors perhaps?). Lot's of use cases and fun to play with!