Deploying and managing your Azure Blueprints as Code
To follow up on my previous post "Deploying and managing your first Landing zone with Azure Blueprints". Let's look at managing your Azure Blueprints as code. Because in the long run, you're really not going to be that efficient when playing the point and click adventure and managing your Azure Blueprints through the Azure Portal. However, what it does provide you with is a great tool to initially create your Blueprint and you give a graphical representation of what you're going to assign.
Use Case
Let's continue the use case as we started in the previous post. I promise, this is the last Star Wars themed post :)

JJ Binks – CEO of Cloud Adventures, has successfully deployed landing zones for his customers. He found that it worked really well but is looking for a more automated way to deploy his landing zones. He want's to leverage Azure DevOps to deploy his environment and quickly learned that this requires him to translate his current Blueprints into code. Additionally, he received a request by Astromech to provide a Web Application and a database to run their R2D2 control panel. The solution must be secured and monitoring should be configured to detect any technical issues and security breaches. If the R2D2 project becomes a success, they will require identical deployments for new projects.
JJ Binks decided that this would be a great use case of his Blueprints as Code project.
Going from Azure Portal to Blueprints as Code
Alright. What we need to do here is to start where we ended with the previous use case. If you've followed the steps in my previous post and you're now managing your Blueprints from the Azure Portal you will probably have noticed that deploying landing zones for new customers or changing parameters can take up quite some time and feels repetitive. What we don't want is to turn our deployment process into a point and click adventure.
Why would you transition to Blueprints as Code? If you can write it in code then that means you can automate the process. And automation means: increased efficiency, less human interaction (errors) and it's easier to scale your deployment process. And we all know that people who do Infrastructure as Code are the most fun at parties.
Transitioning to Blueprints as Code takes little effort. However, dealing with Azure Blueprints as code (adding artifacts, publishing and assigning) is a bit harder to get started with as opposed to going the Azure Portal route. But, the concept remains the same: we're still going to create a draft, publish and assign Blueprints.
We looked at the why but how are you actually going to look cool at parties? Let's start from the beginning and build on top of the Blueprint as we've created in my previous post.
To get started we need the Az.Blueprints module for Azure PowerShell (Install-Module -Name Az.Blueprint).
The first step is to export the current Blueprint. As we've already created one and deployed some environmets with them, we can use the PowerShell module to export that specific Blueprint.
Our Blueprint is stored in the "Manufacturers" Management group and is called "BP-CAF_GettingStarted". Exporting the Blueprint requires just those two pieces of information and is achieved by running the following commands:
$blueprint = Get-AzBlueprint -Name "BP-CAF_GettingStarted" -ManagementGroupId "Manufacturers"
Export-AzBlueprintWithArtifact -Blueprint $blueprint

What we're doing here is storing the Blueprint in "$blueprint" and then exporting it to the current directory. What we end up with is a Blueprint file (Blueprint.json) and the Artifacts stored in the "Artifacts" directory. We can now add artifacts, change parameters and import the Blueprint again (Import-AzBlueprintWithArtifact). Let's try that.
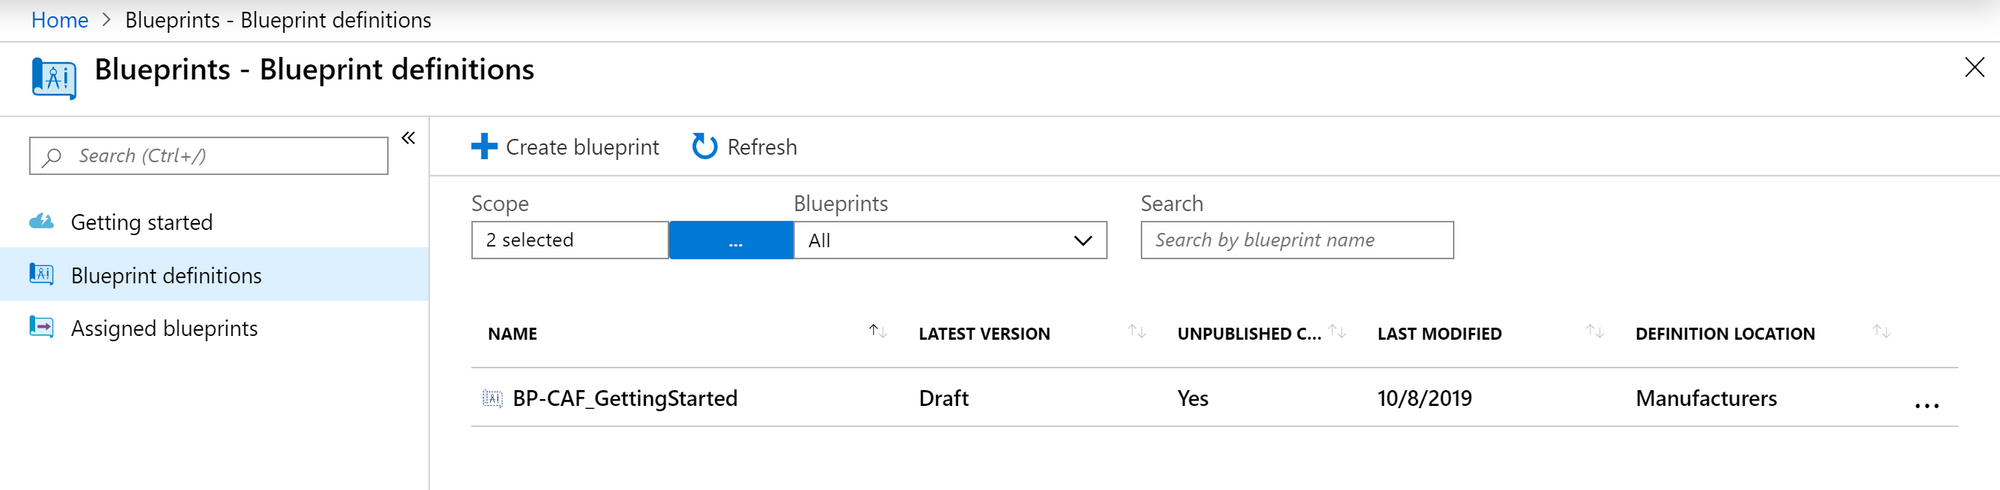
If we look at the current Blueprint ($blueprint). It has three versions (0.1, 0.2 and 0.3).

Let's add a version 0.4. We will do this by importing the definition again (even though we didn't change anything yet) and then publishing a new version. We will do this as follows:
Import-AzBlueprintWithArtifact -Name "BP-CAF_GettingStarted" -ManagementGroupId "Manufacturers" -InputPath .

Publish-AzBlueprint -Blueprint $blueprint -Version 0.4
Note that "-InputPath . " refers tot he current directory. This is the directory where your Blueprint file is location (Blueprint.json).
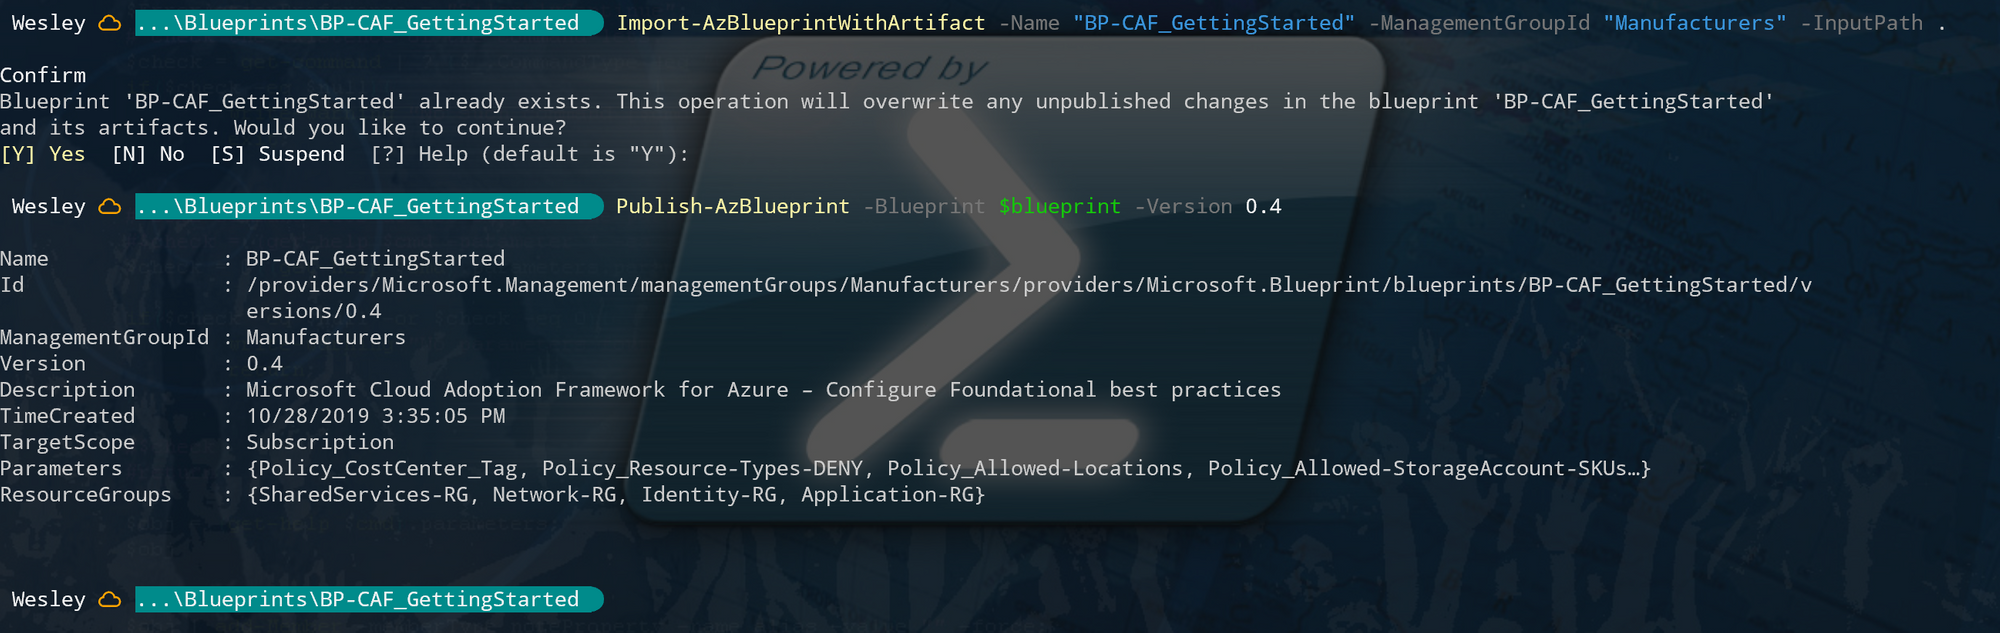
Right.. What just happened here? What we've done is overwritten / updated the current Blueprint Definition (creating a draft) and then published a new version. Effectively adding version "0.4" to the list of Blueprint versions that can be assigned. This process is identical to what's happening within the Azure Portal: You're creating a draft and then publish your Blueprint.

That wasn't too bad. Like I said, it takes only little effort to get started and you're essentially using Blueprints as code by going through this process. But we want more. We want to assign the Blueprint and deploy the new requirements for Astromech.
Optionally you can choose to take a different route and start with Visual Studio Code and generate your Blueprints using the Visual Studio Code Extension "Azure Blueprints Code Generator" by @AmineCharot. A great extension to get started with building Azure Blueprints from Visual Studio Code.
Understanding parameters
Before we move on and actually modify and assign a Blueprint. Let's do a little dive into parameters. Why? Because the thing that makes Blueprints as code complicated is parsing parameters.
If you really want to understand how they work and experiment: I've written a post on Blueprint level parameters earlier this year (here). But for now I'll be using an image from that post to briefly explain parameters.
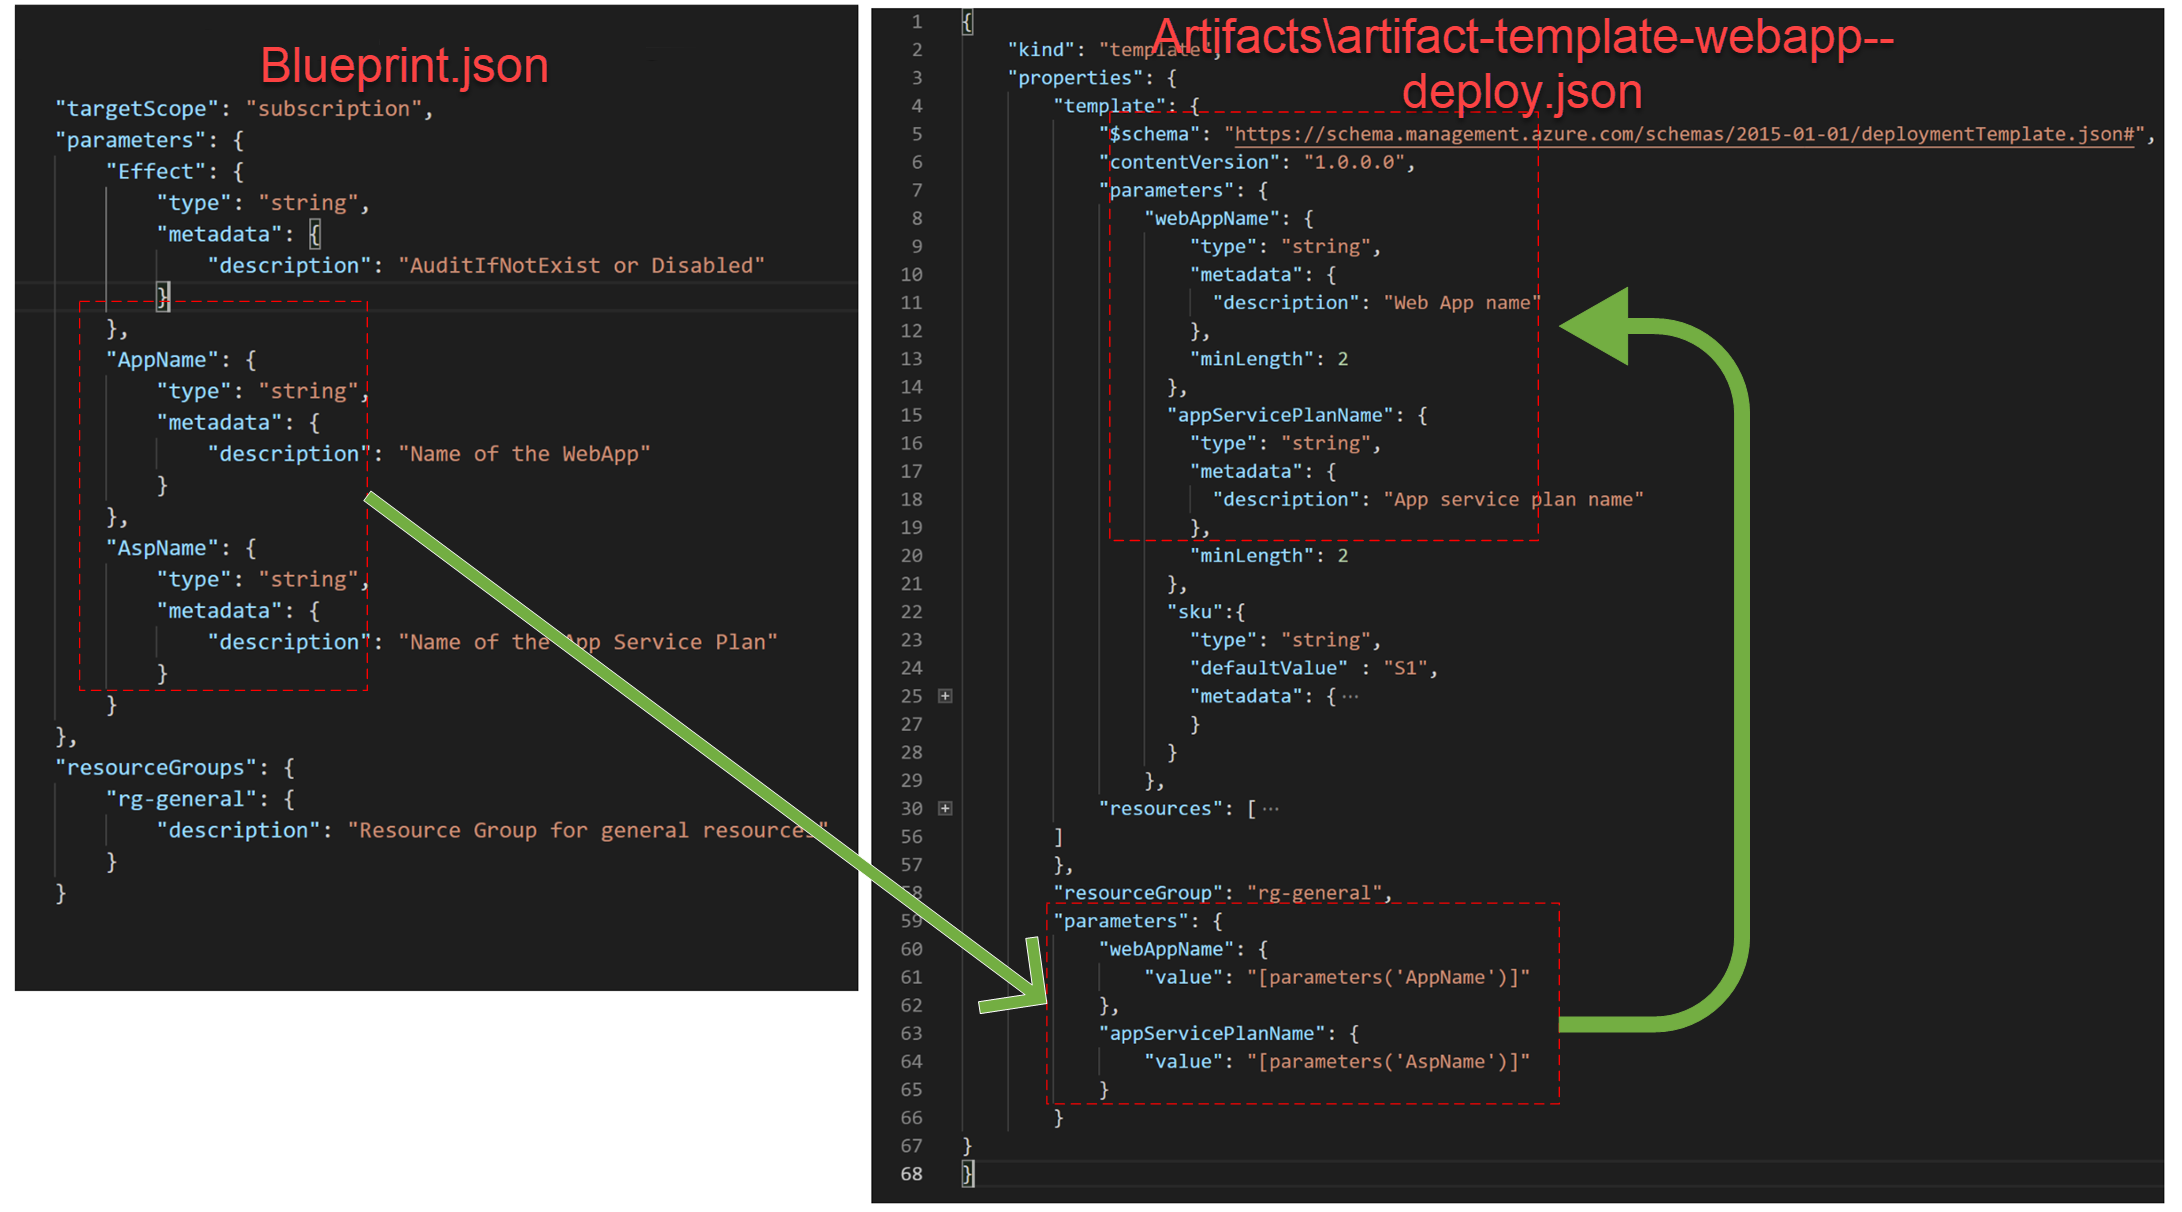
Let's say we have the Blueprint file (Blueprint.json) and an artifact containing the ARM template for a WebApp.
When you assign a Blueprint, you're parsing parameters to the "Blueprint.json". Whenever an artifact is deployed, it takes the parameter contents from the Blueprint file and then parses them into the ARM template artifact (just as if you were providing parameters during a regular ARM deployment). This sounds really complicated but this visualization will help:
Assigning the Blueprint
During the assignment using the Az.Blueprint PowerShell module there are two ways you can parse the parameters:
- Using a hashtable containing the values
- Using an assignment file.
My personal preference is to go with the assignment file as this translates easily into an Azure DevOps / Pipeline scenario (really, you can just chuck your Blueprint.json, artifacts and assignment file into a repository and deploy them).
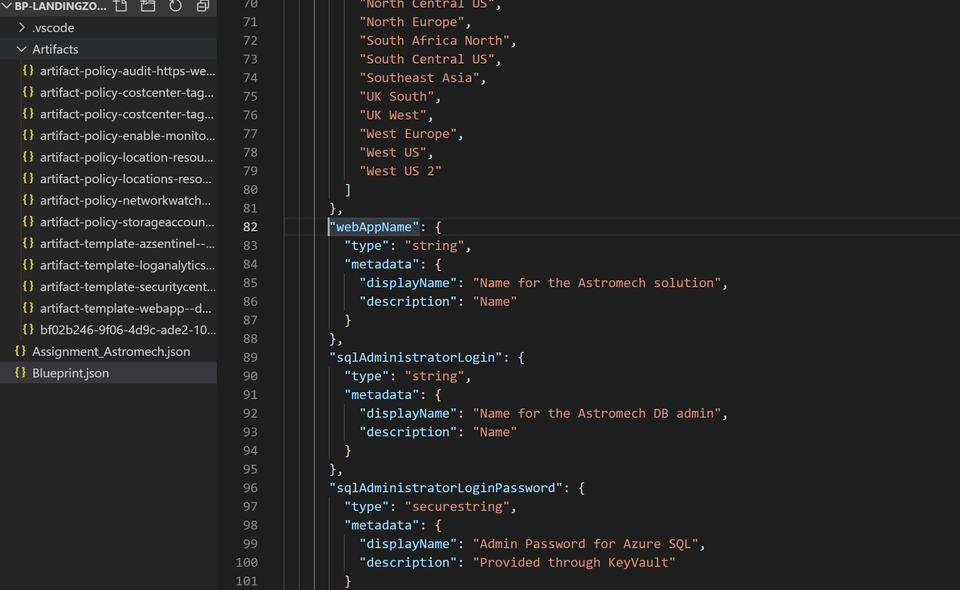
I've modified the Blueprint and copied the contents to a new directory and then added the artifacts that Astromech requires which includes the following:
- Web App with the necessary connection strings
- Application Insights
- Azure SQL Server and Database
- Log Analytics workspace
- Workspace connected to Azure Sentinel
- Additional policies to manage compliance for the Web App and SQL resources
The Blueprint was created using the "Import-AzBlueprintWithArtifact" command and published as version 0.1 using "Publish-AzBlueprint". For this example I've gone with storing the Blueprint on a subscription level as opposed to a Management Group level as we're focusing on Astromech right now. Repeating the process and adding the "ManagementgroupId" parameter will result in the same but on a Management Group level.
We can now start with assigning the Blueprint which requires an assignment file. When exporting the Blueprint, it doesn't come with an assignment file (we're exporting the definition, not the assignment).
The assignment file consists of plain JSON that is sent to the API when assigning the Blueprint.
If you're standardizing your Landing Zones then this is the file that you want to maintain for your customers or customer segment. The blueprint and artifacts would remain the same for each customer and you will create independent assignment files for each customer.
Back to the use case. JJ Binks wants to try this for his customer "Astromech". So let's set up that Assignment file.
The assignment file requires some properties for you to set up. First of all, you need to include all the parameters that your "blueprint.json" requires. This goes into the "parameters" section.
Additionally you can choose to set up a userAssigned managed identity or go with the default System Assigned Managed Identity as documented here. Additionally you need your "BlueprintID" which you can find by requesting "$blueprint" and for the use case we need a Key Vault ID as we're deploying an Azure SQL resource and Azure Blueprints only allows SecureString and SecureObject to come from an Azure KeyVault.
For Astromech the assignment file looks as follows:
{
    "identity": {
        "type": "userAssigned",
        "tenantId": "<TenantID>",
        "userAssignedIdentities": {
            "<UAMI-Resource-ID>": {}
        }
    },
    "location": "francecentral",
    "properties": {
        "blueprintId": "<BLUEPRINT ID>",
        "resourceGroups": {
            "rg-shared": {
                "name": "rg-shared"
            },
            "rg-apps": {
                "name": "rg-astromech-app"
            }
        },
        "locks": {
            "mode": "none"
        },
        "parameters": {
            "Policy_CostCenter_Tag": {
                "value": "CostCenter03581"
            },
            "Policy_Allowed-Locations" : {
                "value": [
                    "France Central",
                    "France South"
                ]
            },
            "Organization_Name": {
                "value": "astro27"
            },
            "LogAnalytics_DataRetention": {
                "value": 30
            },
            "AzureRegion": {
                "value": "France Central"
            },
            "webAppName": {
                "value": "R2D2"
            },
            "sqlAdministratorLogin": {
                "value": "jjbinks"
            },
            "sqlAdministratorLoginPassword": {
                "reference": {
                    "keyVault": {
                      "id": "<KEYVAULTID>"
                    },
                    "secretName": "astromechsqlpassword"
                  }
            }
        }
    }
}
With that file we can now assign the Blueprint and deploy our resources
New-AzBlueprintAssignment -AssignmentFile .\Assignment_Astromech.json -Blueprint $blueprint -Name "bp-assignment-astromech"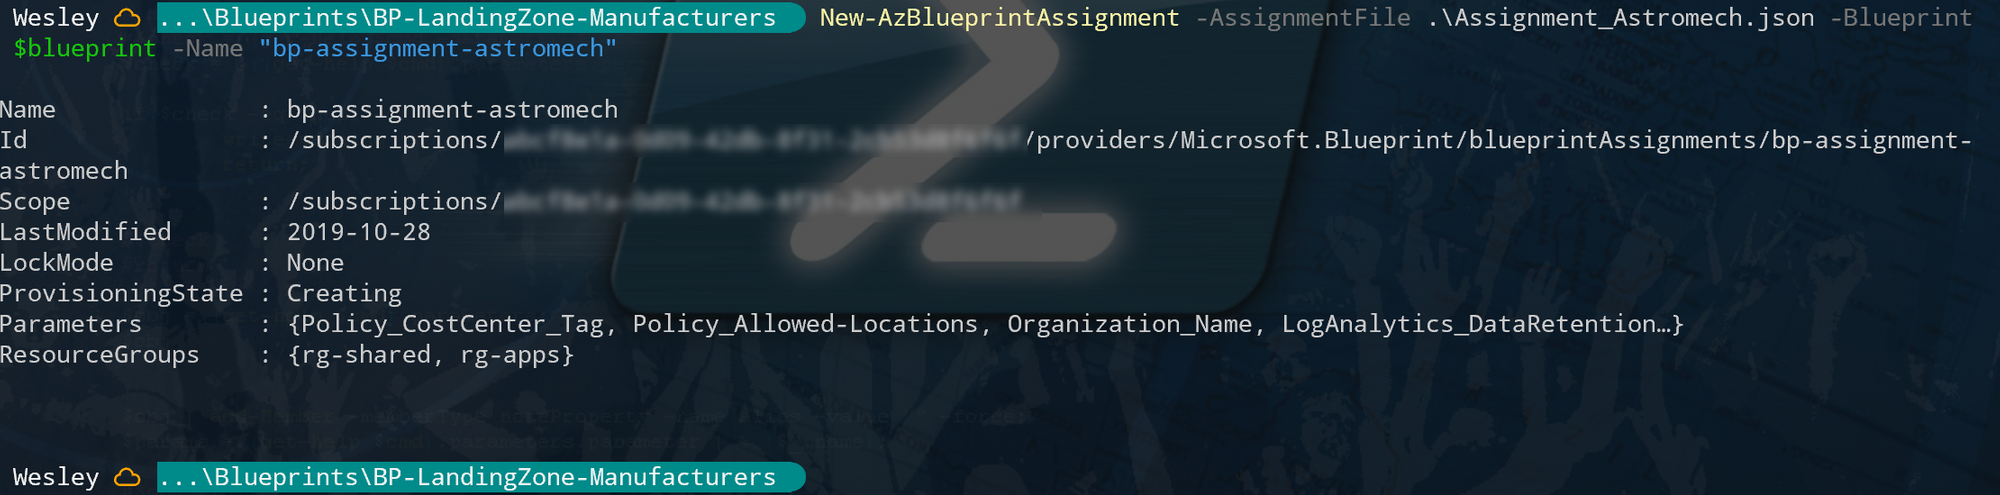
Note that if you want to update a current assignment (for example "bp-assignment-astromech" you can do so by using "Set-AzBlueprintAssignment" and use the exact same parameters as you did during the initial assignment.
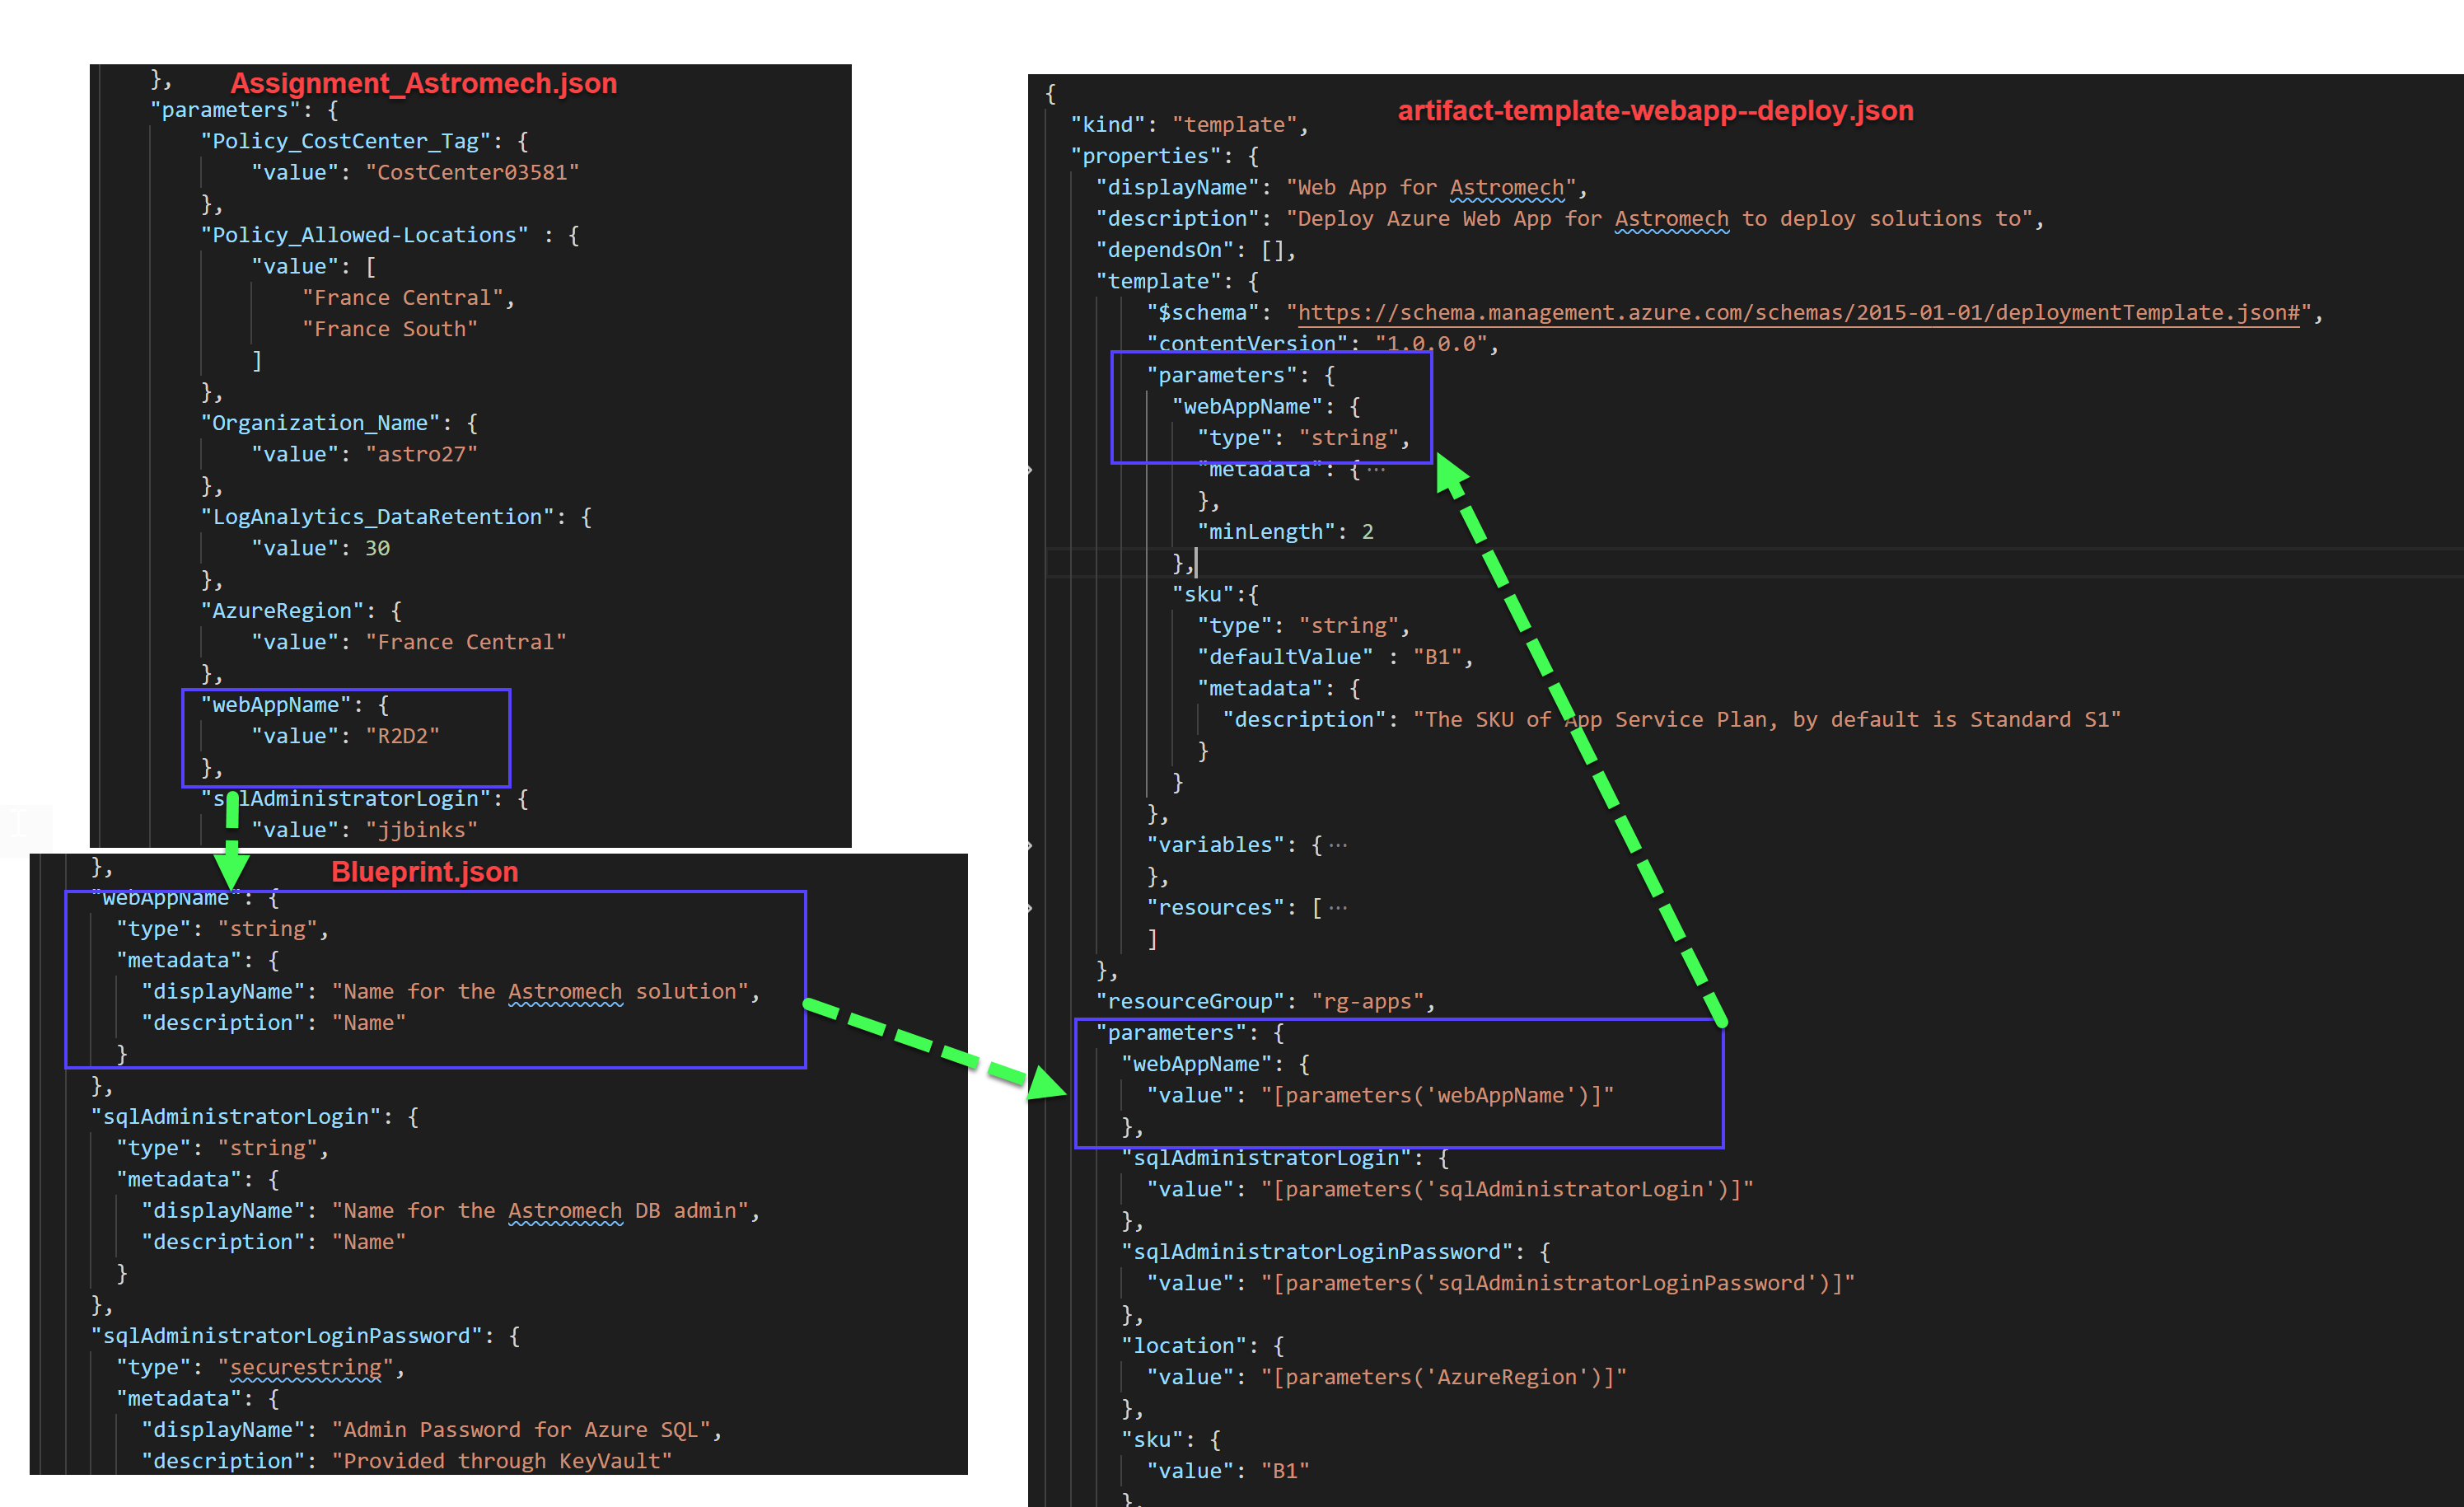
So back to parsing parameters. What just happened? Let's take the "webAppName" parameter as an example.
We started with adding the value for "webAppName" to the assignment file. During the assignment the value is parsed into the "Blueprint.json". During the artifact deployment (artifact-template-webapp-deploy.json), the parameter value is available to the artifact, which then grabs the value and parses it into the actual ARM template just as if you were providing parameters during an ARM deployment.
This sounds rather complicated but it really is something you have to do a couple of times to get the hang of it. Understanding this also greatly improves your skills in debugging Azure Blueprints.
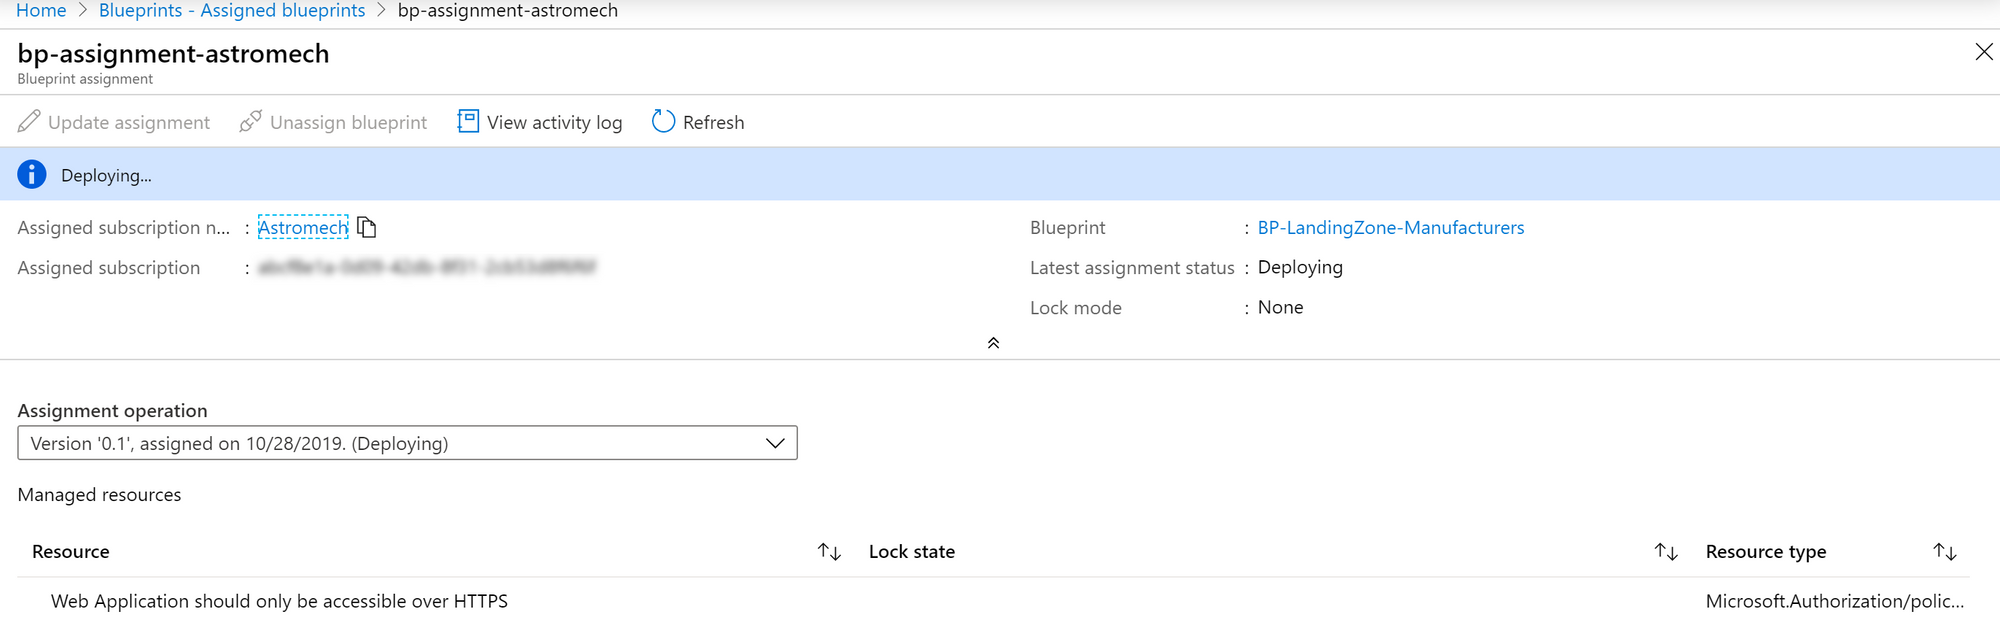
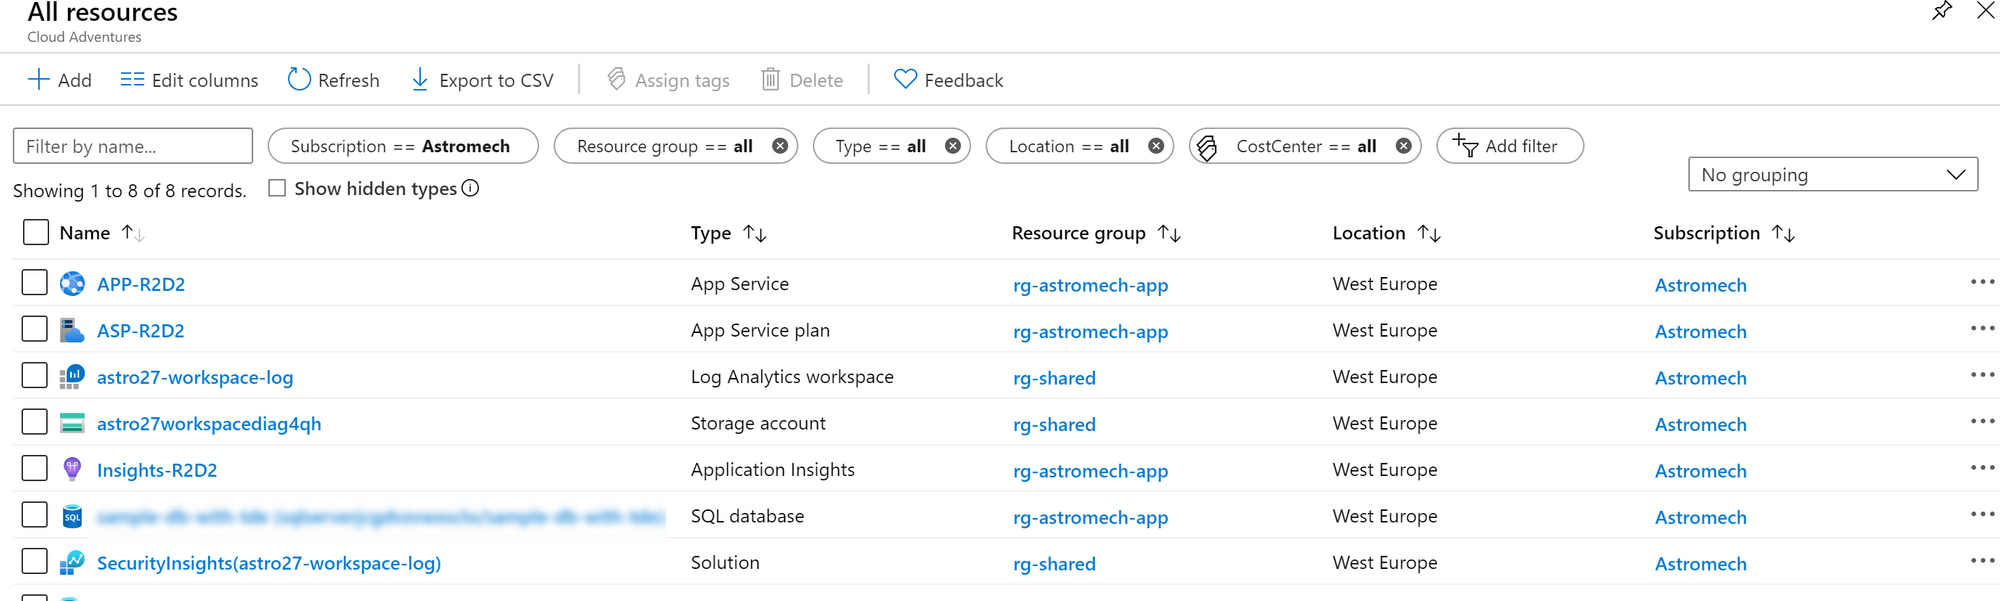
With the assignment completed and succeeded we can see that all resources are deployed and we've successfully deployed a landing zone for the R2D2 Project.

Considerations
To keep it "simple" some file are still using hard coded values. This is something you want to avoid, especially if you're moving onto to deploying Azure Blueprints using Azure DevOps. You also might look into splitting the deployments or even deploy the WebApp itself using a regular ARM Template and just use the Blueprint for the environment set up.
What I'm trying to illustrate is that you can go from "design first" to code without too much effort. What it requires is knowledge of how Blueprints deal with parameters and how the ARM templates fit into that picture.
Your next step could be to go with Azure DevOps as your prefered mechanism for managing Blueprints. And really, the files you've created here can be used as is. The challenge with Azure DevOps and Blueprints altogether is how you'll leverage those technologies to manage multiple customers, cross tenant without having to manage hundreds of pipelines. More on that in next blog posts :)