Introduction to PowerShell on Azure Functions

Microsoft announced the public preview for PowerShell on Azure Functions v2. Allowing you to now run your PowerShell scripts relatively easy on an Azure Function. This will make Azure Functions appealing to a much broader audience. Making the power of Azure Functions accessible for all the Ops people out there. So, what’s the use case here? You can now host and run your PowerShell code serverless, just like all those developers do! 😊
The end for Azure Automation?
Will this be the end for Azure Automation? Maybe but for now unlikely. Many Ops have standardized their processes using Azure Automation and there are some technical differences. For instance: if you’d like to use PowerShell workflows – stick to automation as the Azure Function Runtime is PowerShell core. But it's worth the time to figure out how you can benefit from Azure Functions compared to Azure Automation. Something a public preview is suited for very well.
What PowerShell on Azure functions will provide you with is a great place to run your PowerShell code from, event-driven and pretty fast! Yes, you do have a cold start but it’s nothing like the wait time for an Azure Automation Worker to available to you. And additionally you can opt for a Premium plan with better performance.
In case you missed the announcement and the great intro on Azure Friday: Do watch!
PowerShell on Azure Functions can be really simple, or really complicated whatever you prefer. In this introduction we'll focus on the basic things you need to know to get a function running PowerShell code and give you the basics to build on top of that.
Considerations when using PowerShell on Azure Functions
Moving from Azure Automation to Azure Functions will provide your Dev and Ops people to work on the same technology stack. PowerShell on Azure Functions is great for DevOps processes but does have some drawbacks. These drawbacks can be overcome but in traditional automation, for instance on Azure Automation people tend to deploy scripts that generally run longer than 5-10 minutes.
If you plan on incorporating Azure Functions into your DevOps practices, consider splitting automation logic into multiple functions. In return you get all the love from the serverless technologies that Azure Provides and with all the triggers available (unlike the default webhook on Azure Automation) the possibilities are endless.
You can always consider using a combination of both, which I think will be the biggest use case for now. Short and quick functions on Azure Functions, long running tasks on Azure Automation. Note that Azure Functions don't have the possibilities of configuring a Hybrid Worker to further customize your needs.
And from a technology perspective keep the following in mind:
- On a consumption plan, if your function is running for longer then 5 minutes, it will timeout (this can be increased to 10 minutes);
- A HTTP Trigger won't respond after 230 seconds of runtime (default idle timeout for the Azure Load Balancer);
- If 10 minutes is not enough for you, consider using a Premium plan, which also includes warm start;
- The runtime stack is PowerShell Core.
Note that PowerShell Core for Azure Functions is still in preview.
Requirements
Azure Functions PowerShell worker
As Azure Functions V2 works with language workers, there is now one for PowerShell Core too! Simply clone the repository, build the worker and start writing your functions (https://github.com/Azure/azure-functions-powershell-worker).
Azure Functions Core Tools
Make sure you have the latest version of the Azure Functions Core Tools installed. I mean.. Always have the latest version of Azure Functions Core Tools installed, this will save you a lot of debugging and unexpected behavior :)
Visit https://docs.microsoft.com/en-us/azure/azure-functions/functions-run-local for the latest version of the Core tools and documentation.
Additionally you can use Visual Studio Code to get started (https://docs.microsoft.com/en-us/azure/azure-functions/functions-create-first-function-powershell) but I prefer to do it through the Azure Functions Core Tools as this gives me a better understanding of what's going on.
Getting that first function to run
Let's create a function that will list all Virtual Machines in our subscription. Something you don't really need a function for but this example will cover the basics of running PowerShell on Azure Functions.
Initializing your Function
When you have all the required tools installed you can start by initializing your first function. This is done through "func init --worker-runtime powershell" and will generate the initial files required for your function to run.

As a next step we will create the actual function. This is done by running: "func new -l powershell -t HttpTrigger -n <yourFunctionName>" and it will generate your function which can be ran out of the box!

Note that I'm using the HttpTrigger template here but the PowerShell Language worker comes with more templates than just the Http Trigger. You can list time by running "func templates list -l powershell".
Writing your function
Let's look at the files you'll be working with mostly (for now) and implement our first function.
function.json
As it goes with functions: stuff comes in and stuff comes out. As with all other Language Workers we can configure the reading and writing of data using function.json. In our example we will be using one input binding and one output binding.
For the input binding we will set the "direction" to "in" and by default it is named "Request". This means our function can now take a parameter called "$Request".
For the output binding we will use the default as well which is set to "out" and is named "response". This means that if you push output through this binding, we have to refer to "response". More on that in run.ps1.
Additionally I have set the authLevel to anonymous as this doesn't require any authentication and overly complicate the examples with the codes used to authenticate to a function.
If you are not configuring any other form of authentication, don't do this in production.
function.json
{
  "bindings": [
    {
      "authLevel": "anonymous",
      "type": "httpTrigger",
      "direction": "in",
      "name": "Request",
      "methods": [
        "get",
        "post"
      ]
    },
    {
      "type": "http",
      "direction": "out",
      "name": "Response"
    }
  ]
}
run.ps1
The function runtime will execute run.ps1 by default and takes one or more parameters. In this example we'll be triggering our function through a HTTP request, which requires one input binding, which results in at least one parameter being passed to our function. Note that the name of the input binding has correspond with the input binding in "function.json".
Additionally you can define the "$TriggerMetadata" parameter which contains information on the trigger that started the function. Note that this parameter is optional and you are not required to use it. All trigger have at least a "sys" property which can return valuable data when debugging your Function.
- MethodName: Name of the Function
- UtcNow: When the function was triggered
- RandGuid: Unique identifier for this execution

As stated we will simply return a list of running Virtual Machines. The be specific, the name of these Virtual Machines. For this we're checking if the request contains a parameter called "getvms" and whether it is set to "true". If it is set to true we will store a list of Virtual Machines names in "$body" and eventually use an OutPutBinding to return a response with our contents.
Push-OutputBinding is the cmdlet we will use for this. As it goes with the input binding. The output binding name has to correspond with the output binding as defined in "function.json".
Additionally, I just used a simple cmdlet to list all Virtual Machine names and stored the results in $body. If no input is given, we'll return a HTTP Status Code 400 (BadRequest) and include that an incorrect parameter is given.
using namespace System.Net

# Input bindings are passed in via param block.
param($Request, $TriggerMetadata)

# Interact with query parameters or the body of the request.
$getvms = $Request.Query.getvms
if (-not $getvms) {
    $getvms = $Request.Body.getvms
}

if ($getvms -eq "true") {

    $status = [HttpStatusCode]::OK
    $body = (get-AzVm).name

}
else {
    $status = [HttpStatusCode]::BadRequest
    $body = "Incorrect parameter"
}

# Associate values to output bindings by calling 'Push-OutputBinding'.
Push-OutputBinding -Name Response -Value ([HttpResponseContext]@{
    StatusCode = $status
    Body = $body
})
profile.ps1
PowerShell on Azure Functions works with a “Profile.ps1” (not unlike your local PowerShell environment) which will get executed every time a cold start occurs. As with every Azure Function cold start happens for one of two reasons:
- The function is started for the very first time;
- The function starts after being deallocated due to inactivity.
What’s important to note here (this is stated in the auto generated profile.ps1 as well):
“any variables defined that are not environment variables will get reset after the first execution”
This means that if you define a variable in your profile.ps1 it will be available after a cold start. However if the Function is still “warm” and it is run again, those variables will be empty.
To illustrate:
My profile.ps1 contains the following var: $varInProfile = "Hello from profile.ps1" during my function run time I'm using "Write-Host" to return the contents in the logging window of the Function Runtime:


You will use the profile.ps1 for managing environment and authentication (if persistent) such as Managed Service Identities.
To authenticate and run commands to list our VMs we need to make sure we can connect to them. We will do this by using Managed Service Identity. When generating your function through the Azure Functions Core Tools the below code snippet will be generated as well and will be present in your profile.ps1:
if ($env:MSI_SECRET -and (Get-Module -ListAvailable Az.Accounts)) {
    Connect-AzAccount -Identity
}

$tokenAuthURI = $env:MSI_ENDPOINT + "?resource=https://management.azure.com&api-version=2017-09-01"
$env:tokenResponse = Invoke-RestMethod -Method Get -Headers @{"Secret"="$env:MSI_SECRET"} -Uri $tokenAuthURI
Wait! Azure Functions have application settings. What about them?!
During execution the App Settings are exposed as environment variables. You can request them by using "$env:Name_of_appsetting"
Great for connection strings or other data you need to request from your settings. If we would just output them to the logging window the function this would look as follows:
Write-Host "FUNCTIONS_EXTENSION_VERSION:" $env:FUNCTIONS_EXTENSION_VERSION
Write-Host "FUNCTIONS_WORKER_RUNTIME:" $env:FUNCTIONS_WORKER_RUNTIME
Write-Host "Env from app settings:" $env:HelloAppSettings
Function App Settings (Azure Portal):

Result (Function Log):

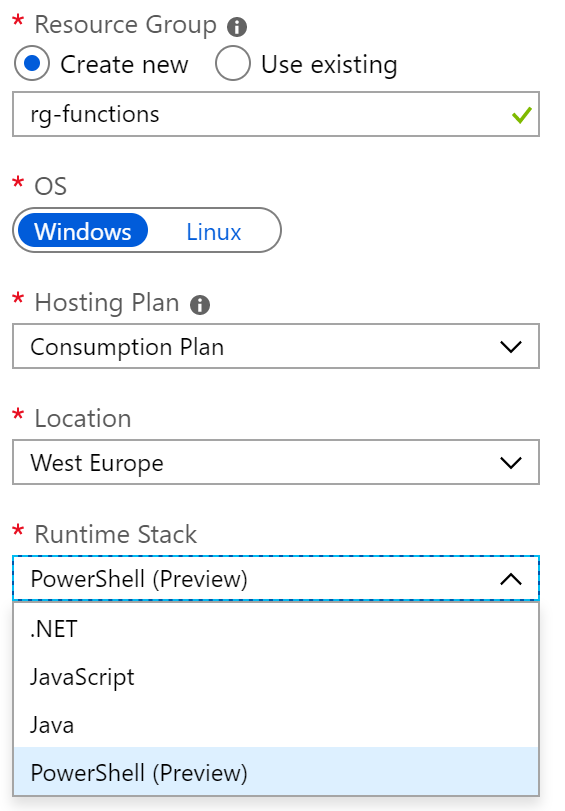
Deploying your Azure Function
Create a new Function form the Azure Portal and make sure you select "PowerShell" as the runtime stack.
Configuring Managed Identity
Because we'll be using Managed Service Identity to authenticate to Azure, make sure you configure a "System Assigned Managed Service Identity" from the Azure Function settings. This can be done by browsing to the "Platform features" > "Identity" > "System Assigned", set the status to "On" and click "Save". After a few seconds your managed identity will be configured.

Fort he function we are going to run, we need access to Virtual Machines. Right now we're just going to request basic information of the Virtual Machines so a role with Reader permissions should do. However, as I'm doing another write-up where I need a bit more permissions I chose to set it to "Virtual machine Contributor". Make sure you select "Function App" and it will automatically suggest your newly created Managed Service Identity.

Publishing your Function
We should be good to go now and we can publish our function. Make sure you are logged in through the Azure CLI tools (az login). If you don't have the Azure CLI tools, get them here: https://docs.microsoft.com/en-us/cli/azure/install-azure-cli?view=azure-cli-latest
Once logged in we can publish our function by running:
"func azure functionapp publish <nameOfYourFunctionApp>"
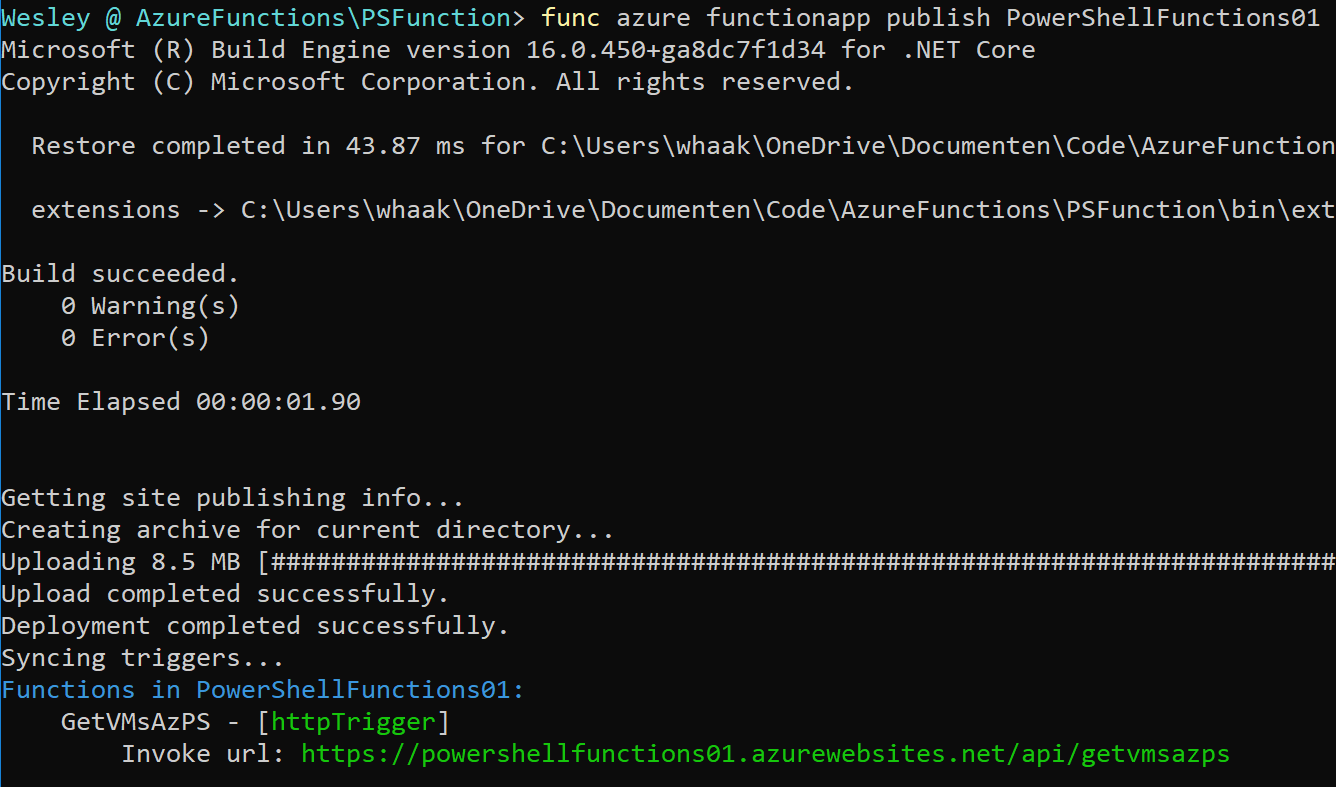
Running the Function
Once published we should be able to request our function.
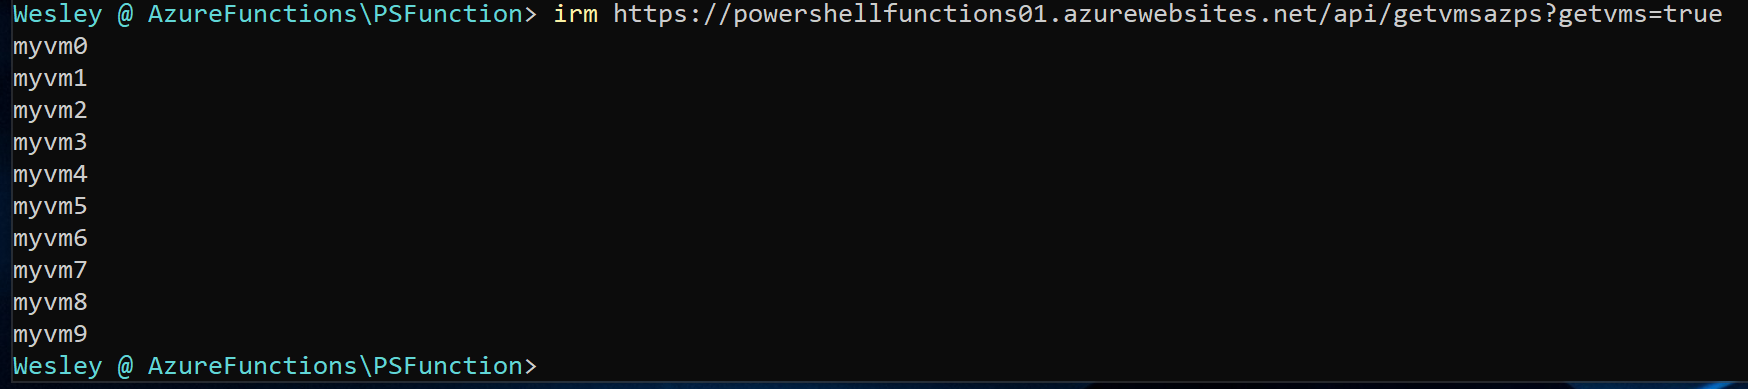
Ofcourse there is much more you can do but this illustrates the very basics of PowerShell core for Azure Functions.